Easy Keto Cheesecake In a Mug Recipe
Keto Cheesecake In a Mug is your new best friend when that sweet craving strikes, and you want to stay firmly on your low-carb path. Forget the hours of baking, the oven mitts, and the lingering guilt of traditional desserts. This incredibly simple, single-serving wonder delivers all the decadent creaminess and tangy goodness of classic cheesecake, without the carb overload. We all love cheesecake, right? Its rich, smooth texture and satisfying sweetness are undeniable. But when you’re committed to keto, that indulgence often feels out of reach. That’s where this magical Keto Cheesecake In a Mug comes in. It’s the perfect solution for a quick, delicious treat that’s ready in minutes. What makes it truly special is its utter simplicity and the fact that you can whip up a perfectly portioned dessert that’s just for you, anytime the mood strikes. Prepare to be amazed at how something so easy can taste so incredibly good!
Keto Cheesecake In a Mug
Craving a decadent dessert but sticking to your keto lifestyle? Look no further! This Keto Cheesecake In a Mug is your answer to instant gratification. It’s incredibly easy, requires just a handful of simple ingredients, and is ready in minutes. Forget those complicated baking projects; we’re talking about a creamy, dreamy, sugar-free cheesecake that fits perfectly into your low-carb, high-fat way of eating, all served in a convenient mug. This recipe is a lifesaver for those moments when a sweet tooth strikes hard and fast. It’s also perfect for portion control, ensuring you get that satisfying cheesecake flavor without overindulgin extractg. The magic happens in the microwave, transforming humble ingredients into a surprisingly rich and satisfying dessert. I’ve made this countless times when I need a quick treat, and it never disappoints. Let’s get started!
Ingredients:
Getting Started: The Perfect Foundation
The first and most crucial step is to ensure your cream cheese is properly softened. This is non-negotiable for achieving a smooth, lump-free cheesecake batter. If you’ve forgotten to take your cream cheese out of the fridge in advance, don’t worry! You can quickly soften it by cutting it into smaller cubes and microwaving it on 30% power for about 15-20 second intervals, checking frequently, until it’s pliable but not melted. You want it to be easily mashable with a fork. Similarly, having your egg at room temperature will help it incorporate more seamlessly into the batter, preventing any slight curdling and ensuring a more consistent texture. If your egg is cold, you can quickly bring it to room temperature by placing it in a bowl of warm (not hot) water for about 5-10 minutes.
Mixing the Magic
Now for the fun part – mixing! Grab a medium-sized bowl or even the mug you plan to cook your cheesecake in (if it’s microwave-safe and you’re feeling ambitious and want fewer dishes). Add the softened cream cheese and sour cream to the bowl. Using a fork or a small whisk, vigorously cream these two ingredients together until they are completely smooth and no lumps remain. This step is key to a silky-smooth cheesecake texture, so don’t rush it! Once you have a perfectly blended creamy base, it’s time to introduce the sweetness. Add the powdered monkfruit sweetener to the cream cheese mixture. Powdered sweetener is preferred here because it dissolves more easily than granulated versions, again contributing to a smoother batter. Stir until the sweetener is fully incorporated.
Next, it’s time to add the egg. Gently crack the egg into the mixture. It’s important to incorporate the egg gradually to avoid scrambling it. Whisk or stir the egg into the cream cheese mixture until it’s just combined. Overmixing the egg can introduce too much air, which might lead to a slightly different texture when cooked. Finally, add the vanilla extract for that classic cheesecake aroma and flavor. Give everything one last gentle stir until it’s all beautifully combined into a thick, luscious batter. It should resemble the consistency of thick pudding.
Microwaving Your Masterpiece
Once your batter is ready, pour it into a microwave-safe mug. Ensure you don’t fill the mug more than two-thirds full, as the cheesecake will puff up slightly as it cooks. A standard ceramic coffee mug works perfectly for this recipe. Place the mug in the microwave. The cooking time can vary depending on the wattage of your microwave, so it’s best to start with a shorter time and check for doneness. I recommend microwaving on high power for 60 to 90 seconds.
Checking for Doneness and Resting
After the initial cooking time, carefully remove the mug from the microwave using oven mitts or a towel, as it will be hot. The cheesecake should look mostly set, but the center might still appear slightly wet or jiggly. This is perfectly normal! The residual heat will continue to cook it as it rests. If the center still looks very liquid, microwave it in 15-second increments, checking after each interval, until the edges are set and the center is just slightly wobbly. Be careful not to overcook it, as this can result in a rubbery or dry cheesecake.
The Crucial Chill (and Optional Toppings!)
This is perhaps the most important step for achieving that perfect cheesecake texture: chilling. Place the mug in the refrigerator for at least 15-30 minutes. This resting period allows the cheesecake to fully set, firm up, and develop its characteristic rich, creamy texture. The longer it chills, the firmer and more delicious it will become. While you can certainly enjoy it warm, I find it’s at its absolute best when chilled.
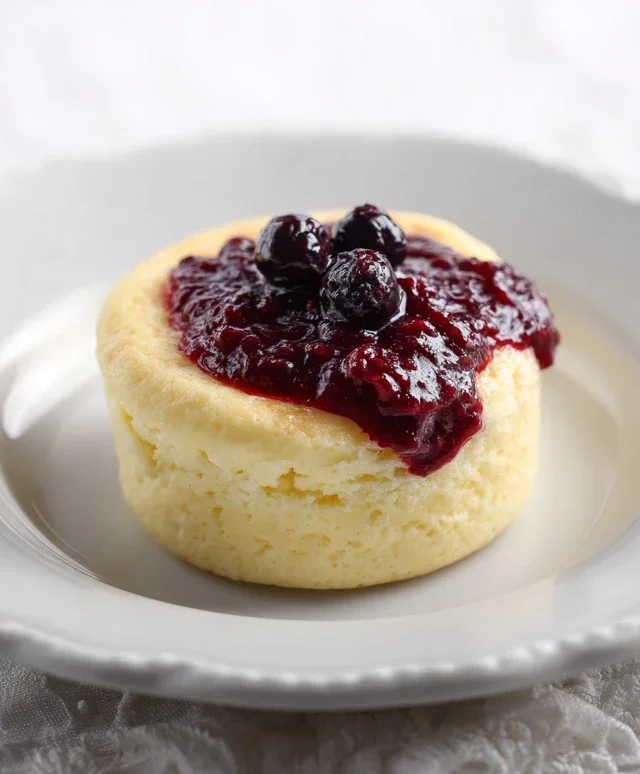
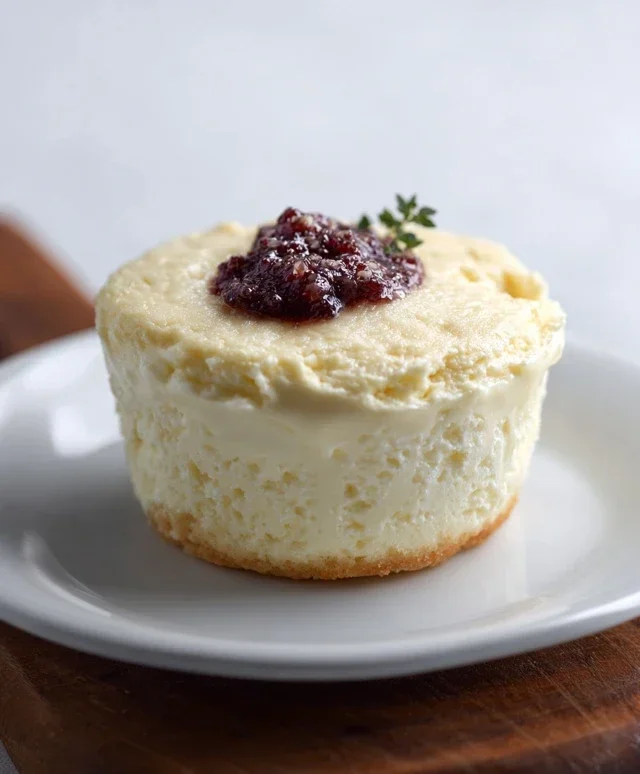
Once chilled, your Keto Cheesecake In a Mug is ready to be devoured! For an extra treat, you can add your favorite keto-friendly toppings. A dollop of extra whipped cream (made with heavy cream and a touch of sweetener), a few fresh berries like raspberries or blueberries, or a drizzle of sugar-free chocolate sauce are all fantastic options that complement the creamy cheesecake flavor beautifully. Enjoy this guilt-free indulgence that satisfies your sweet cravings without derailing your keto journey. It’s the perfect single-serving dessert for any time of day!
Conclusion:
And there you have it – your incredibly simple and satisfying Keto Cheesecake In a Mug! I hope you’re as excited to try this recipe as I am to share it. It’s a true game-changer for those craving that classic cheesecake indulgence without the carb overload. The beauty of this recipe lies in its speed, minimal ingredients, and absolutely delicious outcome. It’s the perfect treat for a weeknight dessert, a midday sweet craving, or even a special occasion when you want something quick and impressive.
Serving this keto cheesecake is wonderfully versatile. I love it straight from the mug with a sprinkle of fresh berries, a drizzle of sugar-free chocolate sauce, or even a dollop of whipped cream. For variations, don’t be afraid to experiment! You could add a hint of lemon zest for a brighter flavor, a pinch of cinnamon for warmth, or even some sugar-free chocolate chips for an extra decadent touch. The possibilities are truly endless, allowing you to customize it to your exact preferences.
I truly encourage you to give this Keto Cheesecake In a Mug a try. It’s so rewarding to create a delicious dessert that fits your keto lifestyle with such ease. Let me know how yours turns out!
Frequently Asked Questions:
Can I make this recipe ahead of time?
Yes, you absolutely can! You can prepare the batter and store it in the refrigerator for up to 2 days. Just microwave it for the instructed time (you might need an extra 10-20 seconds if it’s very cold) when you’re ready to enjoy it. The texture might be slightly different, but it’s still a fantastic option for quick gratification.
What if I don’t have a microwave? Can I bake this keto cheesecake?
While this recipe is designed for the microwave for ultimate speed, you could attempt to bake it in a very small ramekin or oven-safe mug at around 350°F (175°C) for about 15-20 minutes, or until set. Keep a close eye on it, as baking times can vary. However, the microwave method is guaranteed for that fluffy, quick texture.
Can I use different sweeteners?
Yes, you can! If you prefer other keto-friendly sweeteners like erythritol or a blend, feel free to substitute them. Adjust the amount based on the sweetness level of your chosen sweetener, as some can be stronger than others. Always taste and adjust to your personal preference.
Keto Cheesecake In a Mug
A quick and easy keto-friendly cheesecake dessert made in a mug, perfect for satisfying sweet cravings without the carbs.
Ingredients
-
3 1/2 tbsp cream cheese (softened, 52g)
-
1/2 tbsp sour cream (7g)
-
2 tbsp powdered monkfruit sweetener (20g)
-
1 egg (room temperature)
-
1/4 tsp vanilla extract
Instructions
-
Step 1
In a microwave-safe mug, add the softened cream cheese and sour cream. Mix until well combined and smooth. -
Step 2
Stir in the powdered monkfruit sweetener and vanilla extract until fully incorporated. -
Step 3
Add the egg and whisk vigorously until the mixture is smooth and no lumps remain. -
Step 4
Microwave on high for 1 to 2 minutes, or until the cheesecake is set but still slightly jiggly in the center. -
Step 5
Let the cheesecake cool in the mug for a few minutes before enjoying. For a firmer texture, chill in the refrigerator.
Important Information
Nutrition Facts (Per Serving)
It is important to consider this information as approximate and not to use it as definitive health advice.
Allergy Information
Please check ingredients for potential allergens and consult a health professional if in doubt.