Easy Chicken Enchilada Roll Ups- Delicious Recipe
Chicken Enchilada Roll Ups are about to become your new weeknight hero! If you’ve ever found yourself craving that comforting, cheesy, and utterly satisfying flavor explosion of enchiladas but are short on time or looking for a fun, individual-sized twist, then you’ve landed in the right place. We all know and love traditional enchiladas, but these roll-ups take everything we adore about them and package it into a brilliantly simple and incredibly dippable format. What makes this recipe truly special is its effortless assembly; it’s a fantastic way to transform leftover chicken into a vibrant meal that’s perfect for busy families or even for entertaining guests who appreciate a touch of playful presentation. Get ready to experience the beloved taste of chicken enchiladas in a whole new, delightful way!
Why You’ll Love These
These aren’t just another weeknight dinner; they’re a celebration of flavor and convenience. The combination of tender, seasoned chicken, gooey cheese, and a rich enchilada sauce, all rolled up and baked to perfection, is simply irresistible. The individual portions make them easy to serve and incredibly satisfying.
What Makes Them Stand Out
Unlike traditional enchiladas that can sometimes be a bit messy to serve, our Chicken Enchilada Roll Ups offer a clean and elegant presentation. They’re perfect for dipping into your favorite salsa or sour cream, adding an extra layer of enjoyment to every bite. Plus, the rolled format ensures that every bite is packed with delicious filling and sauce.
Chicken Enchilada Roll Ups
Looking for a weeknight dinner that’s big on flavor but surprisingly easy to assemble? These Chicken Enchilada Roll Ups are a game-changer. They capture all the deliciousness of traditional enchiladas – cheesy, saucy, and satisfyingly savory – but in a fun, portable roll-up format that’s perfect for busy evenings. We’re talking tender chicken mixed with creamy cheese and zesty tomatoes, all rolled up in soft tortillas and baked until golden and bubbly. This recipe is a fantastic way to use up leftover cooked chicken, and the prep is so straightforward that even novice cooks can master it. Plus, they’re endlessly adaptable. Don’t like green onions? Swap them for something else! Want to add a little heat? A pinch of cayenne pepper in the filling will do the trick. Let’s get cooking!
Ingredients:
Preparing the Filling
The heart of these roll-ups is a flavorful and creamy filling. To start, grab a medium-sized mixing bowl. Add your 3 cups of shredded chicken to the bowl. If you’re using a whole chicken or chicken breasts that aren’t pre-shredded, make sure they are cooked through and cooled enough to handle. Shredding it with two forks is the easiest method. Next, introduce the softened cream cheese. Make sure your cream cheese is truly softened – leaving it out on the counter for about an hour before you begin extract should do the trick. This will make it much easier to incorporate into the chicken without lumps. Add the entire packet of taco seasoning mix. This is where a lot of the classic enchilada flavor comes from, so don’t skip it! Now, let’s add that zesty kick: the drained can of diced tomatoes with green chilies. Draining them is important to prevent the filling from becoming too watery. Finally, toss in the minced garlic for an aromatic boost.
Using a sturdy spoon or a spatula, begin extract to mix all of these ingredients together. It might feel a little stiff at first, especially with the cream cheese, but keep mixing until everything is well combined and the cream cheese is fully incorporated. You want a cohesive mixture where the chicken is coated in the creamy, cheesy, and spiced base. Don’t be afraid to get in there and really work it together. Once you have a nicely blended filling, it’s time to add the remaining components that will give it that extra texture and freshness.
Adding Texture and Freshness
Now that our creamy base is established, we’ll add the elements that provide some lovely texture and a fresh counterpoint to the richness. Add 1½ cups of shredded Mexican cheese or cheddar cheese to the bowl with the chicken mixture. If you’re using Mexican blend cheese, it often contains a mix of Monterey Jack, cheddar, and sometimes Colby, which melts beautifully. If you prefer a sharper cheddar, feel free to use that! Gently fold the shredded cheese into the filling. You don’t want to overmix here; just incorporate it so it’s distributed throughout.
Next, add the sliced green onions. For this recipe, I like to use both the white and light green parts of the green onions, as they offer a mild oniony flavor and a nice pop of color. Save a few of the brightest green pieces for garnish if you like. Stir them into the filling. The green onions will add a subtle crispness and a fresh, sharp note that balances the creamy and savory flavors of the filling. This step is all about building layers of flavor and texture, making each bite of your roll-ups exciting.
Assembling the Roll Ups
This is where the magic truly happens! Lay one of your burrito-sized flour tortillas flat on a clean work surface. We want the tortillas to be pliable for rolling, so if they feel a little stiff, you can briefly warm them in a dry skillet, microwave, or oven according to package directions. This makes them much easier to work with and less likely to crack.
Now, take about one-fifth of your prepared chicken filling (remember, you have 5 tortillas, so divide the filling evenly). Spread this portion of the filling evenly over the surface of the tortilla, leaving a small border (about half an inch) around the edges. You want to get a good amount of filling on each tortilla, but not so much that it’s impossible to roll. Think of it as creating a delicious layer that will be rolled up.
Once the filling is spread, carefully but firmly start to roll up the tortilla from one edge to the other. Tuck in the sides as you go, if you can, to help create a compact roll. It’s okay if they aren’t perfectly tight; they will hold their shape once baked. Place the rolled tortilla seam-side down in your baking dish. Repeat this process with the remaining four tortillas and the rest of the filling, arrangin extractg them snugly in the baking dish. I like to use a 9×13 inch baking dish for this recipe.
Baking to Perfection
Before we bake these beauties, there’s one more step to ensure they’re beautifully finished. In a small bowl, I like to mix a little extra something to brush over the top. You can use a bit of your favorite salsa, a drizzle of melted butter, or even a little bit of enchilada sauce if you have some on hand. This adds an extra layer of flavor and helps the tops of the roll-ups get nice and golden. Alternatively, you can simply top them with a little extra shredded cheese.
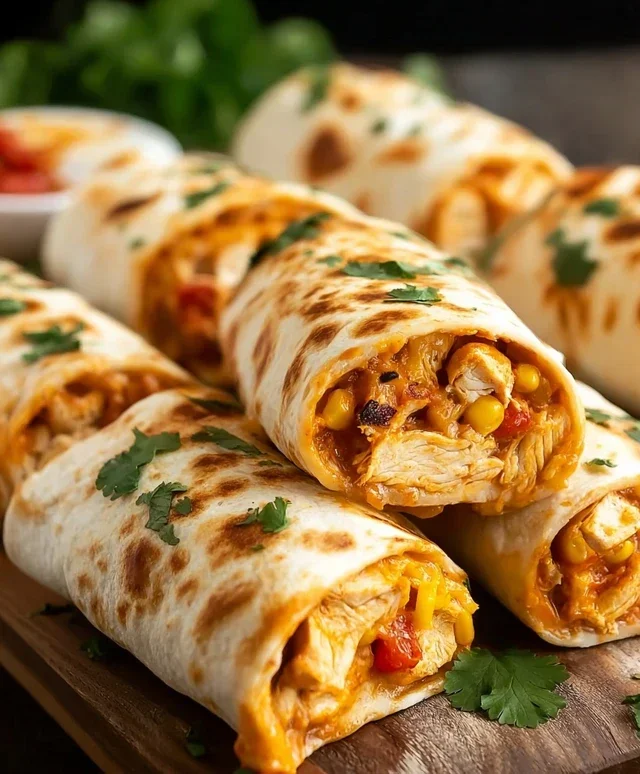
Sprinkle the remaining shredded Mexican cheese or cheddar cheese over the tops of the assembled roll-ups. This is where you get that classic, gooey, melted cheese topping that makes enchiladas so irresistible. The cheese will melt and get beautifully bubbly and browned in the oven.
Now it’s time to bake! Place your baking dish in a preheated oven at 375 degrees Fahrenheit (190 degrees Celsius). Bake for 20 to 25 minutes, or until the cheese is melted and bubbly, and the roll-ups are heated through. You want to see those golden edges and that gorgeous melted cheese. Keep an eye on them to prevent burning.
Serving Your Delicious Creation
Once they’re out of the oven, let the Chicken Enchilada Roll Ups rest in the baking dish for about 5 minutes before serving. This allows the filling to set slightly, making them easier to plate and serve. This short resting period also allows the flavors to meld beautifully.
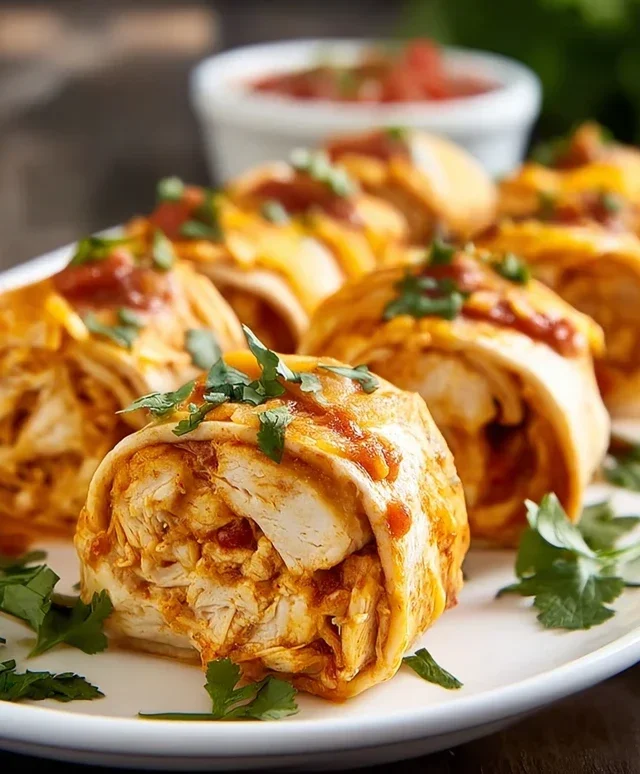
To serve, carefully lift each roll-up onto a plate. Garnish generously with the chopped cilantro, if you’re using it. The fresh, bright flavor of cilantro is a wonderful complement to the rich and savory filling. You can also add a dollop of sour cream, a sprinkle of extra green onions, or some sliced jalapeños for a spicier kick. These roll-ups are fantastic on their own, but they’re also delicious served with a side of rice and beans, a simple salad, or even a scoop of guacamole. Enjoy the delightful taste of these easy and satisfying Chicken Enchilada Roll Ups!
Conclusion:
There you have it – a delightful and approachable way to enjoy the classic flavors of enchiladas without all the fuss! These Chicken Enchilada Roll Ups are a weeknight superhero, offering a satisfying and flavorful meal that’s incredibly easy to customize. The beauty of this recipe lies in its simplicity and versatility, making it perfect for busy families or anyone looking for a delicious and impressive dish that doesn’t require hours in the kitchen. The creamy chicken filling, melty cheese, and zesty enchilada sauce combine for a taste sensation that’s sure to become a new favorite.
I love serving these roll-ups with a dollop of sour cream, a sprinkle of fresh cilantro, and perhaps some sliced avocado for a truly complete meal. They also pair wonderfully with a simple side salad or some Mexican rice. Don’t be afraid to experiment with different cheeses – Monterey Jack, a Mexican blend, or even a touch of sharp cheddar work beautifully. For a bit of heat, add a pinch of cayenne pepper to the chicken mixture or a drizzle of your favorite hot sauce over the top. I truly encourage you to give these Chicken Enchilada Roll Ups a try; I have a feeling you’ll be just as hooked as I am!
Frequently Asked Questions:
Can I make these ahead of time?
Absolutely! You can assemble the roll-ups and place them in your baking dish, cover them tightly, and refrigerate them for up to 24 hours. You might need to add a few extra minutes to the baking time if cooking from cold.
What kind of tortillas work best?
Corn tortillas are traditional and hold up well, but flour tortillas are also a great option and can be a bit more pliable. If using corn tortillas, warming them slightly before rolling can help prevent cracking.
Can I use a different protein?
Certainly! Shredded beef, seasoned ground turkey, or even black beans and corn for a vegetarian version would all be delicious substitutes for the chicken.
Chicken Enchilada Roll Ups
Easy and delicious chicken enchilada roll-ups, perfect for a weeknight meal. These are a fun twist on traditional enchiladas, rolled up and baked for a simpler preparation.
Ingredients
-
5 burrito sized flour tortillas
-
1 ounce packet of taco seasoning mix
-
3 cups shredded chicken
-
8 ounce package of cream cheese, softened
-
1½ cups shredded Mexican cheese or cheddar cheese
-
10 ounce can diced tomatoes with green chilies, drained
-
1 teaspoon minced garlic
-
4 green onions, sliced
-
½ cup chopped cilantro for garnish (optional)
Instructions
-
Step 1
Preheat oven to 375°F (190°C). Lightly grease a 9×13 inch baking dish. -
Step 2
In a large bowl, combine the shredded chicken, softened cream cheese, 1 cup of the shredded Mexican cheese, drained diced tomatoes with green chilies, minced garlic, taco seasoning mix, and sliced green onions. Mix well until all ingredients are thoroughly combined. -
Step 3
Warm the flour tortillas slightly to make them pliable. You can do this by microwaving them for about 15-20 seconds or by warming them briefly in a dry skillet. -
Step 4
Spoon about 1/5 of the chicken mixture onto each tortilla and spread it evenly. Roll up each tortilla tightly. -
Step 5
Place the rolled-up tortillas seam-side down in the prepared baking dish. -
Step 6
Sprinkle the remaining ½ cup of shredded Mexican cheese evenly over the top of the roll-ups. -
Step 7
Bake for 20-25 minutes, or until the cheese is melted and bubbly and the roll-ups are heated through. -
Step 8
Garnish with chopped cilantro, if desired, before serving.
Important Information
Nutrition Facts (Per Serving)
It is important to consider this information as approximate and not to use it as definitive health advice.
Allergy Information
Please check ingredients for potential allergens and consult a health professional if in doubt.