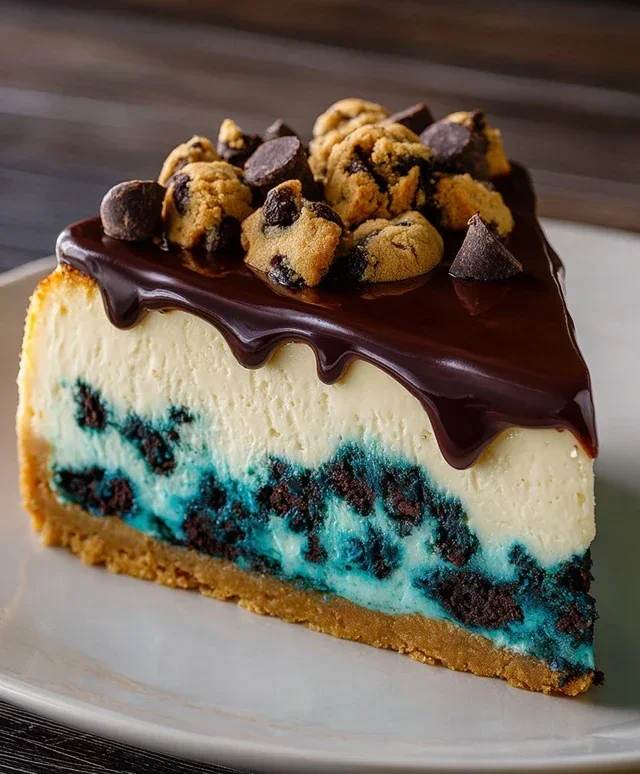
Cookie Monster Cheesecake – The Ultimate Blue Treat
Cookie Monster Cheesecake is not just a dessert; it’s a vibrant, blue-hued invitation to pure, unadulterated joy. We all have that inner child who just wants to dive headfirst into a mountain of deliciousness, and this cheesecake perfectly captures that spirit. What’s not to love about a creamy, dreamy cheesecake base swirled with chunks of chocolate chip cookies and speckled with adorable cookie crum extractbles? It’s the ultimate indulgence, a playful twist on a classic that brings smiles to faces of all ages. The magic of this Cookie Monster Cheesecake lies in its ability to transport you back to simpler times, where the biggest decision of the day was whether to have one more cookie. It’s a party in every bite, a celebration of all things sweet and wonderfully blue. Get ready to unleash your inner Cookie Monster and whip up this sensational treat!
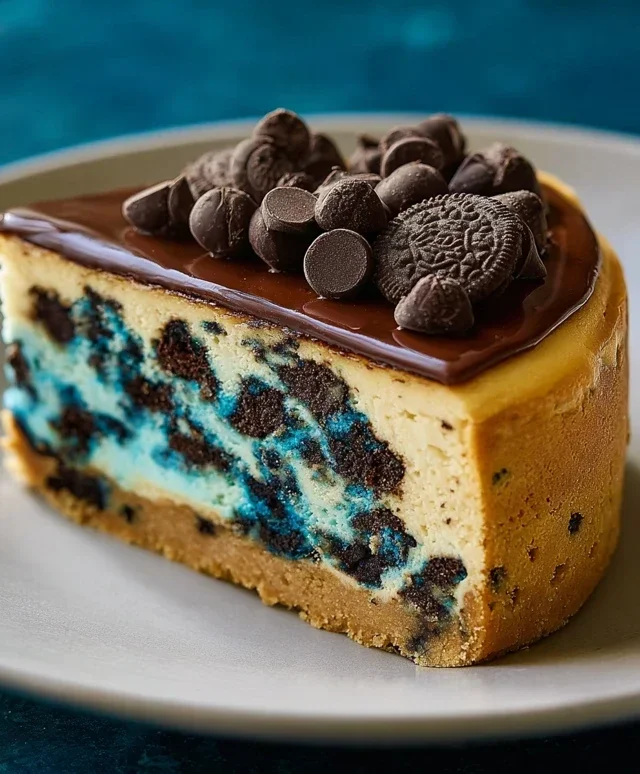
Cookie Monster Cheesecake
Get ready to dive into a world of creamy, dreamy deliciousness with this spectacular Cookie Monster Cheesecake! This isn’t just any cheesecake; it’s a vibrant, fun, and utterly irresistible dessert that’s guaranteed to be the star of any gathering. We’re talking a classic, rich cheesecake filling infused with the delightful flavors and colors inspired by our favorite fuzzy blue friend. The creamy tang of the cream cheese, the sweet swirl of cookie-like flavors, and that gorgeous blue hue will have everyone asking for seconds. So, put on your chef’s hat and let’s get baking this monstrously good treat!
Ingredients:
Cookie Crust Preparation
First, we’re going to create a delightful base for our cheesecake. It’s a simple yet crucial step that adds a wonderful texture and flavor. In a medium bowl, combine the softened unsalted butter, 1/2 teaspoon of salt, and the packed brown sugar. Mix these together until they are well combined and slightly creamy. This will form the sticky base for our cookie-inspired crust.
Next, we’ll add the wet ingredients for the crust. Crack in the 1 egg and add 1 teaspoon of vanilla extract. Beat everything together until it’s smooth and well incorporated. Don’t worry if it looks a little wet at this stage; that’s perfectly normal.
Now it’s time for the dry ingredients. Gradually add the all-purpose flour to the wet mixture, mixing until just combined. Be careful not to overmix at this point; we want to avoid developing the gluten too much. Finally, gently fold in the semisweet mini chocolate chips. This is where the magic starts to happen, giving our crust those little bursts of chocolatey goodness.
Press this cookie dough mixture evenly into the bottom of a 9-inch springform pan. You can use the bottom of a measuring cup or your hands to get a nice, even layer. Make sure to press it firmly against the bottom and slightly up the sides if you desire a small lip, though a flat bottom is standard. We’ll chill this crust while we prepare the cheesecake filling.
Cheesecake Filling Creation
This is where our Cookie Monster inspiration really comes to life! In a large bowl, beat the softened cream cheese until it’s incredibly smooth and free of any lumps. This is a critical step for a silky-smooth cheesecake, so take your time and use an electric mixer if you have one.
Once the cream cheese is beautifully smooth, add the cornflour (cornstarch) and the pinch of salt. Mix these in until they are fully incorporated. The cornflour helps to prevent the cheesecake from cracking and ensures a perfectly set texture.
Now, gradually add the granulated sugar, mixing until it’s combined. We’re building layers of flavor and texture here. Next, pour in the whipping cream and the remaining 1 teaspoon of vanilla extract. Mix everything together until the filling is smooth and creamy.
This is the fun part! Add a generous amount of blue gel food coloring to achieve that iconic Cookie Monster blue. Start with a few drops and mix thoroughly. Add more as needed until you reach your desired vibrant blue hue. Gel food coloring is best because it’s concentrated and won’t add extra liquid to your filling.
Finally, add the 3 eggs, one at a time, beating on low speed until each egg is just incorporated before adding the next. Overbeating after adding eggs can introduce too much air, which can lead to cracks in your cheesecake. Scrape down the sides of the bowl as needed to ensure everything is evenly mixed.
Baking the Masterpiece
Preheat your oven to 325°F (160°C). It’s time to assemble our cheesecake! Pour the vibrant blue cheesecake filling over the prepared cookie crust in the springform pan. Gently tap the pan on the counter a few times to release any air bubbles.
To ensure even baking and prevent cracking, a water bath is highly recommended for cheesecakes. Wrap the outside of your springform pan tightly with heavy-duty aluminum foil, ensuring no water can seep in. Place the foil-wrapped pan into a larger roasting pan. Carefully pour hot water into the roasting pan, so it comes about halfway up the sides of the springform pan.
Bake for approximately 50-60 minutes, or until the edges of the cheesecake are set and the center is still slightly jiggly when you gently shake the pan. The cheesecake will continue to set as it cools.
Cooling and Chilling for Perfection
Once the baking time is up, carefully remove the springform pan from the water bath. Let the cheesecake cool at room temperature on a wire rack for about an hour. This gradual cooling process is essential to prevent cracking.
After it has cooled at room temperature, cover the cheesecake loosely with plastic wrap (making sure it doesn’t touch the surface of the cheesecake) and refrigerate for at least 6 hours, or preferably overnight. This extended chilling time allows the cheesecake to fully set and develop its rich flavor and creamy texture.
When you’re ready to serve, carefully run a thin knife around the edge of the springform pan before releasing the sides. Decorate as desired with whipped cream, more chocolate chips, or even some edible googly eyes to enhance the Cookie Monster theme. Enjoy your spectacular, homemade Cookie Monster Cheesecake!
Conclusion:
You’ve made it to the end, and I truly hope you’re as excited about this Cookie Monster Cheesecake as I am! This recipe is a dream come true for any cookie and cheesecake lover, bringin extractg together the creamy, dreamy texture of a classic cheesecake with the irresistible crunch and flavor of cookies and, of course, those signature blue hues. It’s a guaranteed showstopper for parties, birthdays, or just a special treat to brighten your day. The delightful contrast of textures and the fun, vibrant appearance make this more than just a dessert; it’s an experience!
Serving suggestions are plentiful! This cheesecake is fantastic on its own, letting its vibrant colors and flavors shine. For an extra decadent touch, consider a dollop of whipped cream or a drizzle of chocolate sauce. It also pairs wonderfully with a cold glass of milk, just like your favorite cookies!
Feeling adventurous? You can easily adapt this Cookie Monster Cheesecake. Try swapping out some of the cookie pieces for chocolate chips, M&Ms, or even crum extractbled Oreos for a different twist. You could also experiment with different extracts in the cheesecake filling for a subtle flavor variation. The possibilities are as endless as Cookie Monster’s appetite!
So, don’t be shy – dive in and give this recipe a whirl! I know you’ll love the reaction you get when you present this delightful creation. Happy baking!
Frequently Asked Questions:
How long does the Cookie Monster Cheesecake need to chill?
For the best texture and to allow the flavors to meld, I recommend chilling your Cookie Monster Cheesecake for at least 6 hours, but ideally overnight. This ensures it’s firm enough to slice cleanly and that the creamy filling is perfectly set.
Can I make this cheesecake ahead of time?
Absolutely! This cheesecake is a fantastic make-ahead dessert. In fact, it’s best made a day in advance. Once it’s fully chilled and set, you can cover it tightly with plastic wrap and store it in the refrigerator for up to 3-4 days. This makes it perfect for entertaining!
What kind of cookies work best in this cheesecake?
I love using a mix of classic chocolate chip cookies for that familiar flavor and texture. You can also incorporate crum extractbled Oreos or even slightly softer sugar cookies. Just make sure they aren’t too moist, as this can affect the cheesecake’s texture.
Cookie Monster Cheesecake
A fun and colorful Cookie Monster-inspired cheesecake with a chocolate chip cookie crust and creamy cheesecake filling tinted blue.
Ingredients
-
4 oz unsalted butter, melted
-
1/2 tsp salt
-
2.6 oz brown sugar, tightly packed
-
1 egg
-
1 tsp vanilla extract
-
4.4 oz all-purpose flour
-
4 oz semisweet mini chocolate chips
-
16 oz cream cheese, softened
-
2 tsp cornflour
-
3.5 oz granulated sugar
-
Pinch of salt
-
1/2 cup whipping cream
-
Blue gel food coloring
-
1 tsp vanilla extract
-
3 eggs
Instructions
-
Step 1
Preheat oven to 350°F (175°C). Grease a 9-inch springform pan. -
Step 2
For the crust: In a bowl, combine melted butter, 1/2 tsp salt, brown sugar, 1 egg, 1 tsp vanilla extract, flour, and chocolate chips. Press mixture evenly into the bottom and slightly up the sides of the prepared pan. Bake for 10-12 minutes until lightly golden. Let cool. -
Step 3
For the filling: In a large bowl, beat cream cheese until smooth. Beat in cornflour, granulated sugar, and pinch of salt until well combined. -
Step 4
Beat in whipping cream, 1 tsp vanilla extract, and the 3 eggs one at a time, mixing until just combined after each addition. Stir in blue gel food coloring until desired shade is reached. -
Step 5
Pour the blue cheesecake filling over the cooled crust. -
Step 6
Bake for 50-60 minutes, or until the edges are set and the center is slightly jiggly. -
Step 7
Turn off the oven and let the cheesecake cool in the oven with the door ajar for 1 hour. Remove from oven and cool completely on a wire rack. Chill in the refrigerator for at least 4 hours before serving.
Important Information
Nutrition Facts (Per Serving)
It is important to consider this information as approximate and not to use it as definitive health advice.
Allergy Information
Please check ingredients for potential allergens and consult a health professional if in doubt.