Red White and Blue Dirt Cups- Easy Dessert Recipe
Red, White and Blue Dirt Cups are more than just a dessert; they’re a playful explosion of patriotic spirit and childhood nostalgia. Imagin extracte layers of creamy chocolate pudding, crushed chocolate cookies resembling rich soil, and vibrant red and blue berries bursting with freshness. What’s not to love about this whimsical treat? It’s incredibly easy to assemble, making it a perfect activity for little hands to help create. Every spoonful of these Red, White and Blue Dirt Cups delivers a satisfying combination of textures and flavors that adults and kids alike adore. They’re the ultimate crowd-pleaser for summer barbecues, Fourth of July celebrations, or any occasion where a touch of fun and festivity is desired. Get ready to dig into this delightful dessert!
Red, White and Blue Dirt Cups
Get ready for a truly patriotic and utterly delicious treat that’s as fun to make as it is to eat! These Red, White and Blue Dirt Cups are a fantastic way to celebrate holidays like the Fourth of July, Memorial Day, or even just a summer get-together. They’re a playful twist on the classic dirt cup, incorporating vibrant colors and the beloved combination of creamy pudding and crunchy cookies. Kids and adults alike will be delighted by the layered spectacle and the satisfyingly sweet flavor. Plus, they’re incredibly easy to assemble, making them a perfect activity for the whole family. Let’s dive into creating these festive delights!
Ingredients:
Getting Started: The Pudding Base
The foundation of our dirt cups is the creamy, dreamy cheesecake pudding. This flavor offers a slightly tangy and rich base that complements the chocolatey “dirt” perfectly. First, gather your pudding boxes. You’ll need two, and the cheesecake flavor is a wonderful choice for its smooth texture and subtle sweetness. In a large bowl, combine the contents of both pudding boxes with the 4 cups of milk. It’s important to use cold milk for the best results – it helps the pudding set up properly and achieve that desired thick consistency.
Now, it’s time to get whisking! Using a whisk or an electric mixer on low speed, vigorously combine the pudding mix and milk. Whisk for about two minutes, or until the mixture begin extracts to thicken. Don’t be tempted to stop too soon; consistent whisking is key to preventing lumps and ensuring a smooth pudding. Once you’ve achieved a smooth, thickened consistency, cover the bowl with plastic wrap, making sure the wrap directly touches the surface of the pudding. This prevents a skin from forming on top, which can be a bit unappealing. Place the pudding in the refrigerator to set for at least 30 minutes. This chilling time is crucial for the pudding to firm up before we start layering.
Creating the “Dirt”
No dirt cup is complete without its signature “dirt”! This is where our Oreo cookies come into play. You’ll need 19 Oreo cookies. For the best “dirt” texture, I like to crush them into fine crum extractbs, almost like coarse sand. You can achieve this by placing the cookies in a zip-top bag and then going at them with a rolling pin or a mallet. Alternatively, a food processor works wonders for a quick and consistent crum extractb. The goal is to have most of the cookies broken down, but a few slightly larger pieces can add a nice textural contrast, mimicking real soil. Set these crushed cookies aside for now; they’ll be layered in with the pudding.
Adding the Patriotic Colors
This is where the magic happens and our dirt cups get their festive “Red, White and Blue” flair! We need to divide our cheesecake pudding into three portions and color two of them. Take out your chilled pudding and divide it as evenly as possible into three separate bowls. Leave one bowl plain for the white layer. In the second bowl, add ¼ teaspoon of red gel food dye. Gel food coloring is preferred over liquid because it’s more concentrated and won’t thin out your pudding as much. Stir this red dye in thoroughly until you achieve a vibrant, uniform red color. In the third bowl, add ¼ teaspoon of blue gel food dye. Again, stir until the color is completely incorporated, creating a rich blue hue. Make sure to clean your spoon or whisk between colors to avoid mixing them unintentionally.
Assembling Your Red, White and Blue Masterpieces
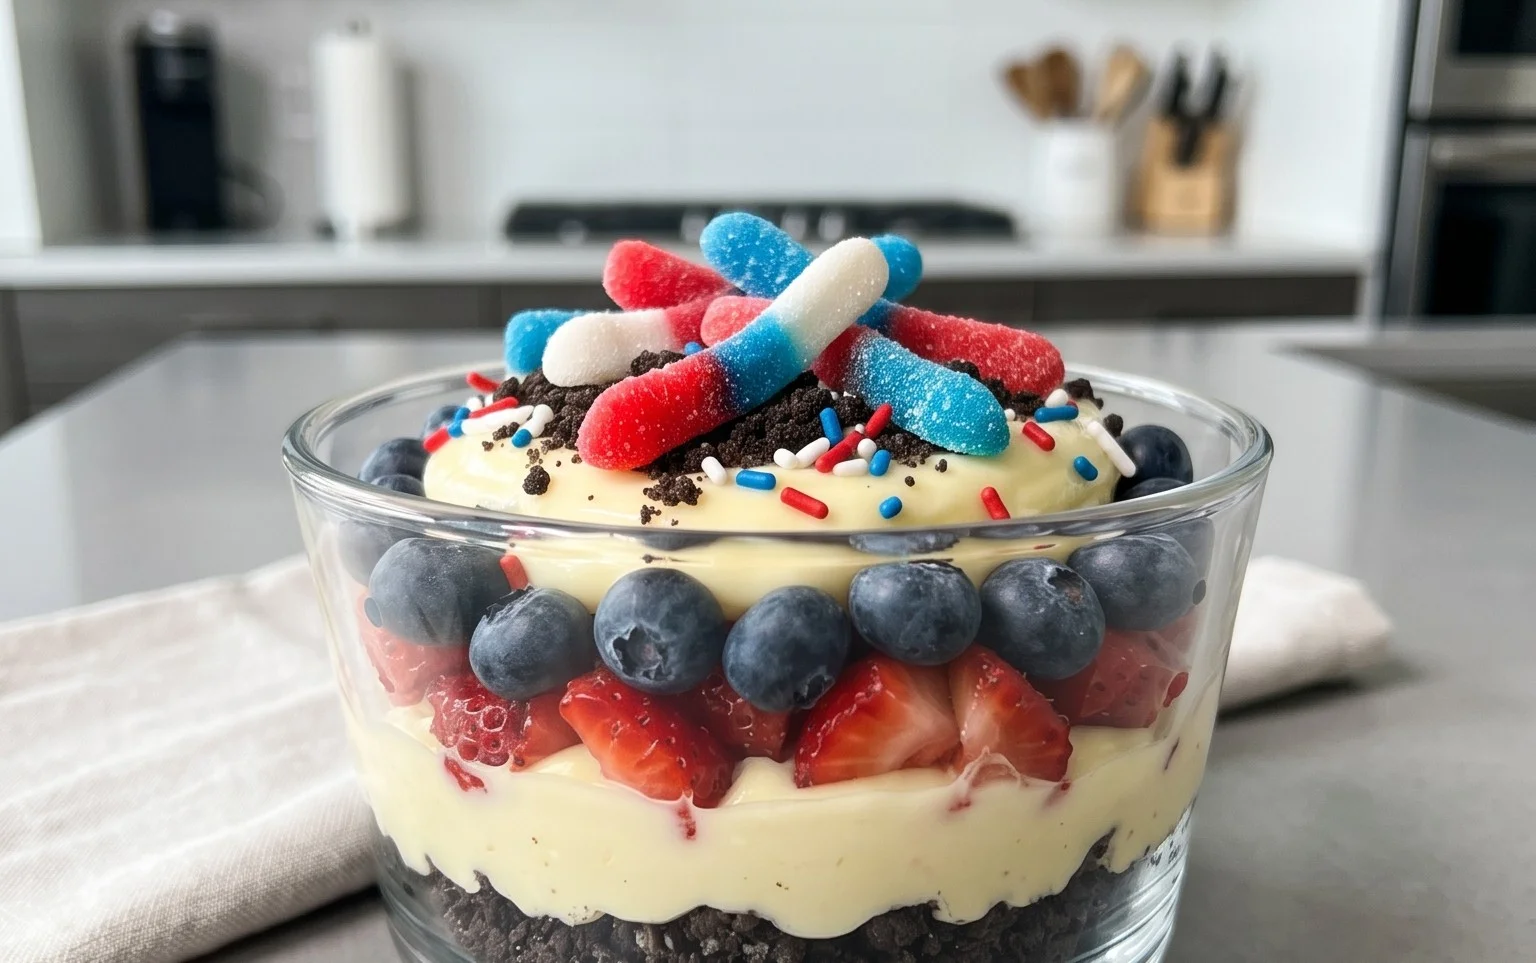
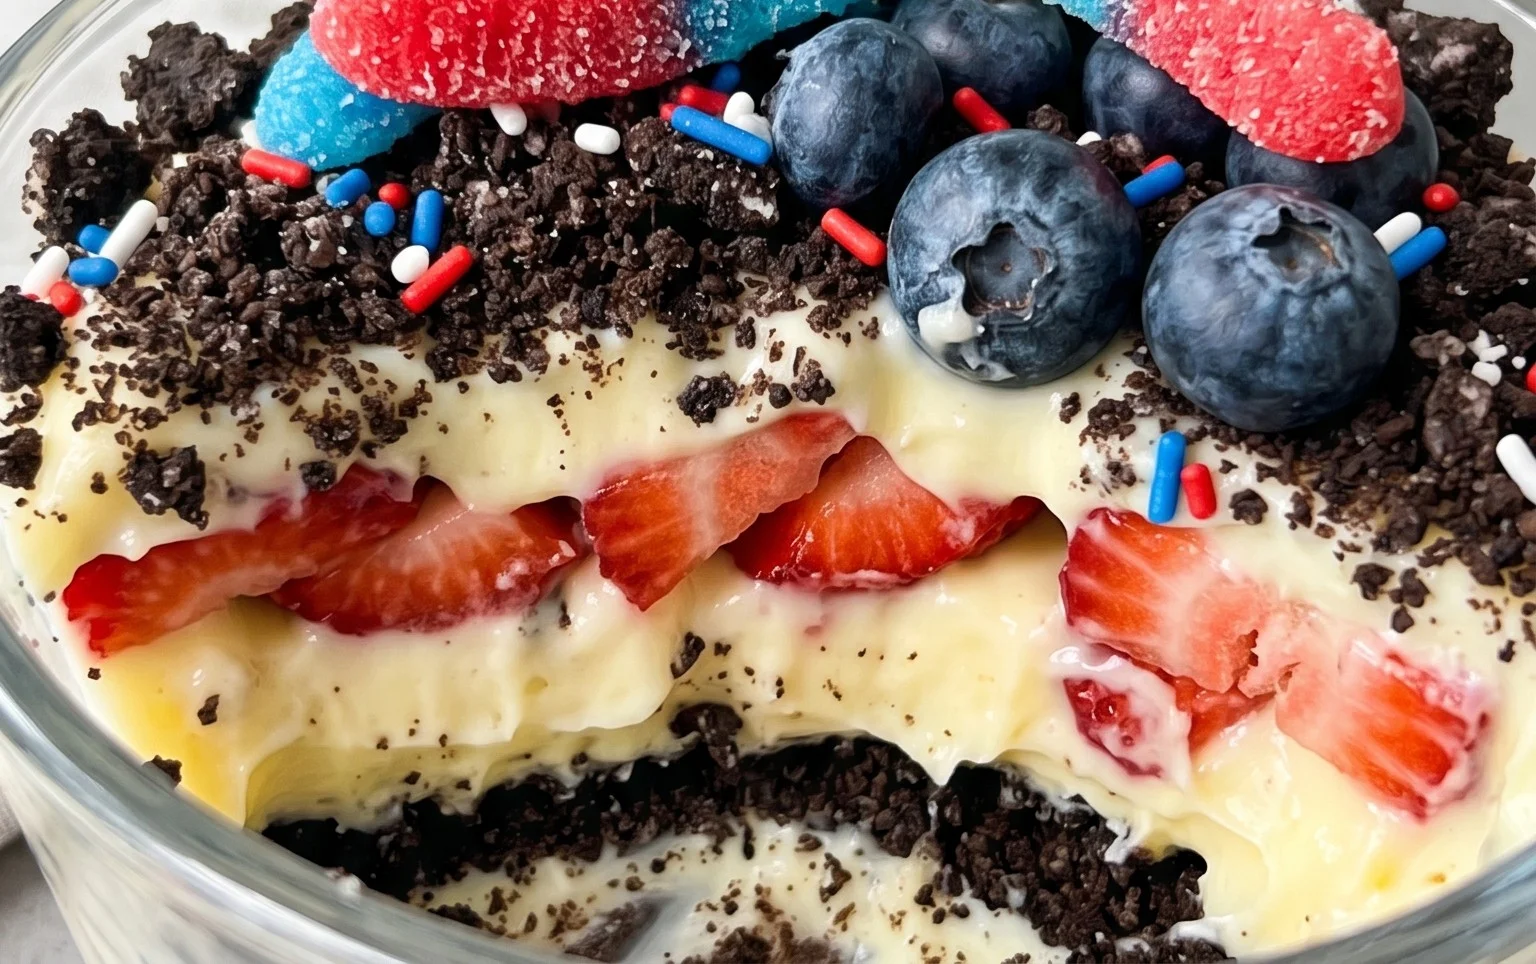
Now for the fun part: assembling the dirt cups! You can use any clear glasses, jars, or even small disposable cups for this. The clear containers allow you to see the beautiful layers you’re creating.
1. The First Layer of “Dirt”: Begin extract by spooning a layer of crushed Oreo cookies into the bottom of each of your chosen cups. This forms the base of our “dirt” layer. Don’t be shy with it; a good half-inch layer is perfect.
2. The White Pudding Layer: Next, carefully spoon a layer of the plain, white cheesecake pudding over the cookie crum extractbs. Try to spread it evenly to create a distinct white layer. You can use a spoon or a piping bag for a neater application, especially if you want very clean lines between your layers.
3. The “Red Dirt” Layer: Now, it’s time for some patriotic color! Spoon the red cheesecake pudding on top of the white layer. Again, aim for an even layer. You might want to gently tap the bottom of the cup on your counter a couple of times to help settle the layers and remove any air pockets.
4. The Second “Dirt” Layer: Add another layer of crushed Oreo cookies over the red pudding. This mimics the disturbed soil effect and adds more crunchy texture.
5. The Blue Pudding Layer: Finally, spoon the blue cheesecake pudding over the red cookie layer. This creates the top colorful layer. You can gently smooth the top of the blue pudding, or leave it a bit more rustic to enhance the “dirt” look.
6. The Finishing Touch: Gummy Worms! To complete your festive dirt cups, carefully insert the red and blue gummy worms into the pudding. Stick them in at different angles to make it look like they’re crawling out of the “dirt.” You should have 8 gummy worms to adorn your 8 dirt cups.
Once assembled, you can serve these immediately, or for an even firmer set and chilled treat, pop them back into the refrigerator for another 15-30 minutes before serving. These Red, White and Blue Dirt Cups are a guaranteed hit for any celebration! Enjoy the ooohs and aaahs from your guests as they dig into this delightful dessert.
Conclusion:
There you have it – a delightful and easy recipe for Red, White and Blue Dirt Cups that’s sure to be a hit at any gathering, especially during patriotic holidays! This recipe is fantastic because it’s incredibly simple to assemble, making it perfect for a fun kitchen activity with kids, and it’s customizable to suit any taste or occasion. The combination of creamy pudding, crunchy cookie crum extractbs, and fresh fruit creates a wonderfully balanced dessert that looks as festive as it tastes.
I love serving these dirt cups as individual treats in clear cups or small mason jars for a charming presentation. They are also a fantastic addition to a dessert buffet or as a fun surprise in packed lunches. Don’t be afraid to get creative with variations! You can swap the chocolate pudding for vanilla or even cheesecake flavored. For extra texture, add some chopped nuts or mini marshmallows to your “dirt” layer. The possibilities are endless when it comes to making these Red, White and Blue Dirt Cups your own. So go ahead, give this recipe a try – I promise you won’t be disappointed!
Frequently Asked Questions:
How far in advance can I make these dirt cups?
You can assemble the dirt cups up to 24 hours in advance. It’s best to add the fresh fruit just before serving to prevent it from becoming too soft. Store them covered in the refrigerator.
Can I use a different type of cookie for the “dirt”?
Absolutely! While chocolate sandwich cookies are traditional, you can also use Oreos (with or without the cream filling), chocolate wafers, or even grabeef ham crackers for a slightly different flavor and texture.
Are there any dairy-free options for this recipe?
Yes! You can easily make these dairy-free by using a dairy-free chocolate pudding mix and a dairy-free milk alternative (like almond, soy, or oat milk) to prepare it. For the whipped topping, opt for a coconut-based whipped cream alternative.
Red, White and Blue Dirt Cups
A festive and fun layered dessert made with cheesecake pudding, crushed Oreos, and colorful gummy worms, perfect for patriotic holidays.
Ingredients
-
2 boxes cheesecake pudding (3.4 ounces each)
-
4 cups milk
-
19 Oreo cookies (crushed)
-
¼ teaspoon red gel food dye
-
¼ teaspoon blue gel food dye
-
8 red and blue gummy worms
Instructions
-
Step 1
In a large bowl, whisk together the cheesecake pudding mix and milk until well combined and beginning to thicken. Let stand for 5 minutes. -
Step 2
Divide the pudding into three separate bowls. Leave one bowl plain for the white layer. -
Step 3
Add the red gel food dye to one of the bowls and stir until evenly colored. Add the blue gel food dye to the remaining bowl and stir until evenly colored. -
Step 4
In the bottom of individual serving cups or a larger dish, layer a spoonful of crushed Oreo cookies. This will be the ‘dirt’. -
Step 5
Spoon alternating layers of the white, red, and blue pudding over the cookie crumbs. -
Step 6
Top each dirt cup with more crushed Oreo cookies and garnish with red and blue gummy worms, sticking them into the pudding to resemble worms coming out of the dirt. -
Step 7
Chill for at least 30 minutes before serving for the best flavor and texture.
Important Information
Nutrition Facts (Per Serving)
It is important to consider this information as approximate and not to use it as definitive health advice.
Allergy Information
Please check ingredients for potential allergens and consult a health professional if in doubt.