Soft Chewy Lemon Cookies- Easy Recipe
Soft & Chewy Lemon Cookies are the quintessential treat that brightens any day. There’s something utterly captivating about that perfect balance of sweet and tart, a delightful dance on your taste buds that makes you reach for just one more. We all crave that feeling of biting into a cookie that’s not too crisp, not too cakey, but lands squarely in that glorious sweet spot of soft and chewy perfection. These aren’t just any cookies; they’re little bursts of sunshine, packed with zesty lemon flavor that cuts through the sweetness beautifully, making them irresistible. What truly makes these Soft & Chewy Lemon Cookies special is their incredible versatility – perfect with a cup of tea, as a post-dinner indulgence, or even just a midday pick-me-up. Get ready to fall in love with this easy recipe that guarantees incredibly tender and utterly delightful lemon cookies every time.
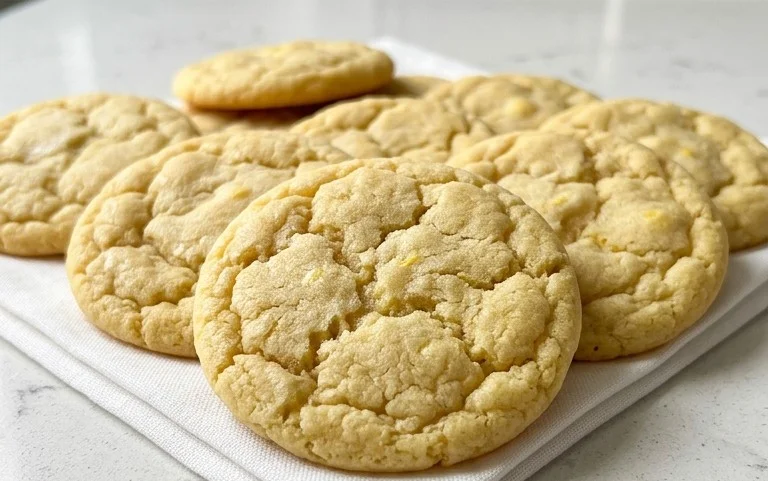
Soft & Chewy Lemon Cookies
There’s something undeniably special about a perfectly baked cookie. And when it comes to cookies, few flavors are as bright, refreshing, and utterly delightful as lemon. These Soft & Chewy Lemon Cookies are a testament to that – they are bursting with vibrant citrus flavor, boast a wonderfully tender texture, and have a satisfyingly chewy bite. Forget those dry, crum extractbly lemon cookies of the past; these are the real deal. They’re perfect for an afternoon treat, a delightful addition to a cookie platter, or even a thoughtful homemade gift. The secret lies in a few key ingredients and a careful approach to achieving that coveted chewy texture. Let’s get baking!
Ingredients:
Cooking Instructions:
Step 1: Creaming the Foundation for Chegrape juicess
The journey to soft and chewy cookies begin extracts with properly creaming our butter and sugar. In a large mixing bowl, combine the 1 ½ cups of granulated sugar with the softened unsalted butter. Using an electric mixer (a stand mixer with a paddle attachment is ideal, but a hand mixer works perfectly well too), beat these ingredients together on medium speed until they are light and fluffy. This process is crucial as it incorporates air into the mixture, which contributes to the cookie’s structure and texture. You want to see the color lighten considerably, and the mixture should have a smooth, almost whipped consistency. This usually takes about 3-5 minutes. Don’t rush this step; it’s a vital foundation for our chewy cookies.
Step 2: Infusing with Lemon Flavor
Now it’s time to amp up that gorgeous lemon flavor. Add the tablespoon of lemon zest to the creamed butter and sugar mixture. The zest is where a lot of the intense lemon oil resides, so don’t skimp on it! Next, incorporate your room-temperature egg and egg yolk, one at a time, beating well after each addition until fully combined. Using room-temperature eggs helps them emulsify better with the butter and sugar, creating a smoother batter and a more consistent cookie. Finally, stir in the lemon extract. If you’re using the alternative of lemon and vanilla extract, add both now. This combination provides a deep, nuanced lemon flavor that is both bright and comforting. Continue mixing until everything is just incorporated. Over-mixing at this stage can develop the gluten too much, leading to tougher cookies, so aim for just combined.
Step 3: Building the Dry Mix and Incorporating It
In a separate medium bowl, whisk together your dry ingredients: the 3 cups of all-purpose flour (remember to spoon and level it rather than scooping directly from the bag to ensure an accurate measurement), the baking soda, cornstarch, and salt. The cornstarch is another secret weapon for achieving a tender, chewy texture. It helps to tenderize the flour and prevent the cookies from spreading too much while maintaining that desirable soft bite. Once your dry ingredients are well combined, gradually add them to the wet ingredients in the large mixing bowl. Mix on low speed until just combined, being careful not to overmix. It’s perfectly fine if there are still a few streaks of flour remaining at this point; the subsequent steps will help to fully incorporate them.
Step 4: Achieving the Perfect Dough Consistency and Chilling
Now for the magic ingredient that truly enhances the chegrape juicess: the lemon juice. Gently stir in the 2 tablespoons of lemon juice until just combined. The dough will likely seem a little soft, but don’t worry. This is where chilling comes in. Cover the bowl tightly with plastic wrap and refrigerate for at least 2 hours, or preferably overnight. This chilling period is crucial. It allows the flour to fully hydrate, the gluten to relax, and the flavors to meld. It also solidifies the butter, which prevents the cookies from spreading too much during baking, thus ensuring they stay thick and chewy. The dough should be firm enough to handle and scoop after chilling.
Step 5: Shaping, Rolling, and Baking to Perfection
Preheat your oven to 350°F (175°C) and line baking sheets with parchment paper. This step is important for preventing sticking and ensuring even baking. In a shallow bowl, place the ¼ cup of granulated sugar reserved for rolling. Scoop rounded tablespoons of the chilled cookie dough and roll them into balls. Gently roll each ball in the reserved sugar until evenly coated. This sugar coating will create a delightful sweet crust and a beautiful glistening finish on your cookies. Place the sugar-coated dough balls about 2 inches apart on the prepared baking sheets. You can also gently flatten them slightly with the palm of your hand if you prefer a slightly thinner cookie, but for maximum chegrape juicess, leaving them as balls is often best. Bake for 10-13 minutes, or until the edges are set and lightly golden, but the centers still look slightly soft and underbaked. They will continue to bake and firm up on the hot baking sheet after you remove them from the oven. Allow the cookies to cool on the baking sheet for 5-10 minutes before transferring them to a wire rack to cool completely. This resting period is essential for them to fully set and achieve that perfect chewy texture. Enjoy these delightful, zesty treats!

Conclusion:
I hope you’re as excited to bake these Soft & Chewy Lemon Cookies as I am to share them with you! This recipe truly delivers on its promise of a perfectly tender and delightfully chewy cookie, bursting with bright, zesty lemon flavor. They’re surprisingly simple to make, yet the results are sophisticated enough for any occasion. Whether you’re looking for a delightful afternoon treat, a sweet addition to your dessert table, or a thoughtful homemade gift, these lemon cookies are sure to impress. I love serving them with a cup of herbal tea or a cold glass of milk. They also pair beautifully with a scoop of vanilla bean ice cream for a truly decadent experience.
Don’t be afraid to experiment with variations! You can add a handful of white chocolate chips for a creamy sweetness, or a sprinkle of poppy seeds for a subtle crunch and visual appeal. A light lemon glaze drizzled over the cooled cookies takes them to the next level. I encourage you to gather your ingredients and give these Soft & Chewy Lemon Cookies a try – I’m confident you’ll fall in love with their irresistible texture and vibrant citrus taste. Happy baking!
Frequently Asked Questions:
Q: How do I store these lemon cookies to keep them soft and chewy?
To maintain their delightful texture, store your cooled Soft & Chewy Lemon Cookies in an airtight container at room temperature. Adding a slice of bread to the container can help absorb excess moisture and keep them soft for up to 3-4 days.
Q: Can I make the dough ahead of time?
Absolutely! The cookie dough can be made and then chilled in the refrigerator for up to 3 days. Chilling the dough actually enhances the flavor and texture, so this is a great option if you want to bake them fresh without all the mixing on the day of.
Q: My cookies spread too much. What went wrong?
Several factors can cause cookies to spread excessively. Ensure your butter wasn’t too soft or melted when creaming it with the sugar. Also, be careful not to overmix the dough once the flour is added. Chilling the dough before baking is another excellent way to prevent over-spreading.
Soft & Chewy Lemon Cookies
Delightfully soft and chewy cookies bursting with bright lemon flavor, perfect for any occasion.
Ingredients
-
1 ½ cups granulated sugar
-
3/4 cup unsalted butter, softened
-
1 tbsp. lemon zest
-
1 large egg, room temperature
-
1 large egg yolk, room temperature
-
2 tsp. lemon extract
-
3 cups all-purpose flour, spooned and leveled
-
1 tsp. baking soda
-
1 tsp. cornstarch
-
3/4 tsp. salt
-
2 tbsp. lemon juice
-
¼ cup granulated sugar, for rolling & garnishing
Instructions
-
Step 1
Preheat oven to 350°F (175°C). Line baking sheets with parchment paper. -
Step 2
In a large bowl, cream together 1 ½ cups granulated sugar and softened butter until light and fluffy. -
Step 3
Beat in the lemon zest, egg, egg yolk, and lemon extract until well combined. -
Step 4
In a separate medium bowl, whisk together the flour, baking soda, cornstarch, and salt. -
Step 5
Gradually add the dry ingredients to the wet ingredients, mixing until just combined. Stir in the lemon juice. -
Step 6
Roll rounded tablespoons of dough into balls and then into the ¼ cup granulated sugar for rolling and garnishing. -
Step 7
Place cookies 2 inches apart on the prepared baking sheets. -
Step 8
Bake for 9-12 minutes, or until the edges are lightly golden but the centers are still soft. -
Step 9
Let cookies cool on the baking sheets for a few minutes before transferring them to a wire rack to cool completely.
Important Information
Nutrition Facts (Per Serving)
It is important to consider this information as approximate and not to use it as definitive health advice.
Allergy Information
Please check ingredients for potential allergens and consult a health professional if in doubt.