Easy Buster Bar Ice Cream Cake Recipe
Buster Bar Ice Cream Cake isn’t just a dessert; it’s a nostalgic journey back to childhood summers and pure, unadulterated joy. If you’ve ever experienced the magic of a classic Buster Bar, you know the irresistible combination of chocolate, peanuts, and creamy ice cream. This ice cream cake captures all those beloved flavors and elevates them into a show-stopping dessert perfect for birthdays, holidays, or just making any ordinary day extraordinary. We’re talking about layers of rich chocolate cake, luscious vanilla ice cream swirled with caramel, and a generous coating of crunchy peanuts and chocolate magic shell. It’s the ultimate treat that satisfies every craving and will have everyone asking for seconds. Get ready to create your own legendary Buster Bar Ice Cream Cake!
Why You’ll Adore This Buster Bar Ice Cream Cake
A Symphony of Textures and Flavors
What truly sets this Buster Bar Ice Cream Cake apart is its incredible textural complexity. Imagin extracte biting through a delicate chocolate cake, then sinking into cool, smooth ice cream, all punctuated by the satisfying crunch of roasted peanuts. The decadent chocolate shell acts as the perfect crown, adding another layer of delightful snap. It’s a masterpiece that appeals to all the senses, making it an instant crowd-pleaser. Prepare to be amazed by how easily you can recreate this iconic treat in your own kitchen.
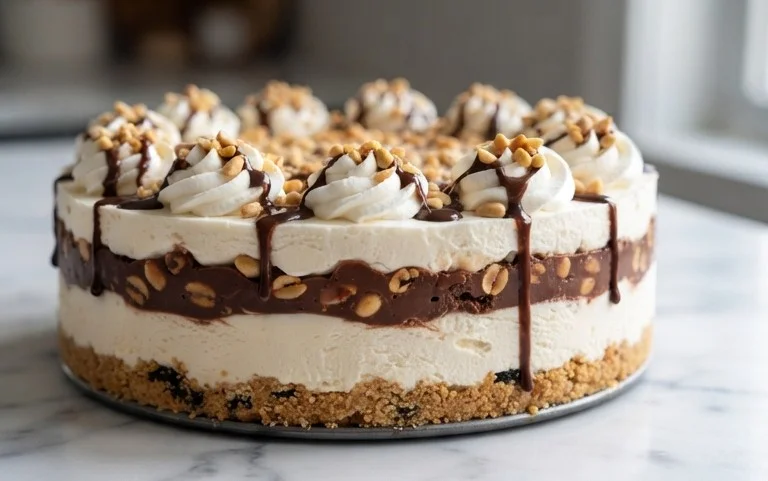
Buster Bar Ice Cream Cake
Are you ready to create a frozen dessert masterpiece that will have everyone beggin extractg for the recipe? This Buster Bar Ice Cream Cake is inspired by those beloved, nostalgic ice cream treats, but elevated into a show-stopping cake format. It’s surprisingly easy to assemble and the combination of crunchy crackers, creamy vanilla ice cream, rich hot fudge, salty peanuts, and a crisp chocolate shell is simply divine. Perfect for birthdays, summer gatherings, or anytime you need a serious dose of deliciousness, this cake is sure to become a family favorite. Let’s get started on creating this frozen delight!
Ingredients:
Assembling Your Frozen Masterpiece
The beauty of this Buster Bar Ice Cream Cake lies in its layered construction. We’ll be building our cake in stages, ensuring each component has a chance to firm up before we move on to the next. Patience is key here, as we want a well-defined and delicious dessert.
Step 1: Preparing the Cracker Base
First, we need to create our crunchy foundation. Take your 10 chocolate grabeef beef ham crackers and arrange them in a single layer on the bottom of your serving dish or cake pan. If you’re using a springform pan, this is the ideal time to prepare it. For a regular dish, simply ensure the crackers cover the base as much as possible. If you like a more uniform base, you can gently break some crackers to fill in any small gaps, but don’t worry about it being perfectly seamless. The ice cream will fill in any slight imperfections.
Step 2: The First Layer of Ice Cream and Hot Fudge
Now, let’s bring in the ice cream. You’ll want your gallon of vanilla ice cream to be softened slightly, but not completely melted. This will make it much easier to spread. Take about half of the softened vanilla ice cream and spread it evenly over the layer of chocolate grabeef beef ham crackers. Aim for a smooth, even layer. Once your ice cream layer is in place, gently warm your 14-ounce jar of hot fudge sauce according to package directions. It doesn’t need to be piping hot, just warm enough to pour easily. Drizzle about half of the warm hot fudge sauce generously over the vanilla ice cream layer. Don’t be shy with the fudge! Then, place your assembled base into the freezer for at least 30 minutes to allow this layer to firm up significantly. This step is crucial for preventing the layers from becoming a melded mess.
Step 3: Adding the Peanut Crunch and Second Ice Cream Layer
After your first layer has had time to freeze, it’s time for the next exciting addition: the peanuts! Take your 1 1/2 cups of red skin peanuts and sprinkle them evenly over the hardened ice cream and hot fudge layer. The salty crunch of the peanuts is a quintessential part of the Buster Bar experience, so make sure they are well distributed. Next, take the remaining half of your softened vanilla ice cream and carefully spread it over the peanuts. Again, aim for an even layer, ensuring the peanuts are mostly covered. Once this second ice cream layer is in place, return the cake to the freezer for another hour, or until it’s firm to the touch. This longer freezing time is important for ensuring the entire cake will hold its shape when you add the final chocolate coating.
Step 4: The Grand Finnon-alcoholic ale – The Magic Shell Coating
This is where the magic truly happens! Once your cake is thoroughly frozen and firm, it’s time to add the iconic chocolate shell. You’ll need your 7.5-ounce Magic Shell chocolate coating. Follow the package instructions for warming the Magic Shell. Usually, this involves a brief period of microwaving or sitting the bottle in hot water, just until it becomes pourable. Once it’s ready, carefully and quickly pour the Magic Shell evenly over the entire top and sides of your frozen ice cream cake. Work swiftly, as the cold ice cream will cause the Magic Shell to harden almost instantly. If you’re having trouble getting complete coverage, you can gently tilt the cake or use a spatula to help spread it, but try to do so as minimally as possible to avoid melting. The goal is a crisp, satisfying shell.
Step 5: Final Freezing and Serving
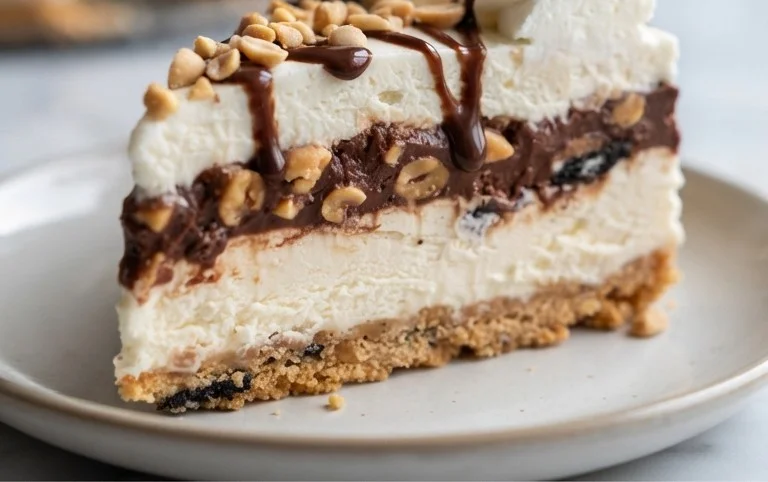
After applying the Magic Shell, place your completed Buster Bar Ice Cream Cake back into the freezer for at least 2 more hours, or ideally, until you are ready to serve it. This final freezing period allows the Magic Shell to fully harden and meld with the ice cream, creating that signature crackle when you cut into it. When you’re ready to serve, carefully remove the cake from the freezer. If you used a springform pan, release the sides. If you used a regular dish, you can slice directly from the dish. Use a sharp knife that has been dipped in hot water and dried to get clean slices. Enjoy the amazing layers of texture and flavor in every bite! This cake is best served immediately after slicing.
Conclusion:
And there you have it – your very own homemade Buster Bar Ice Cream Cake! This recipe is a guaranteed crowd-pleaser, offering a delightful combination of textures and classic Buster Bar flavors. The rich chocolate cake base, creamy ice cream layers, and the iconic crunchy, peanut-buttery topping create a truly irresistible dessert. It’s perfect for birthdays, summer gatherings, or simply as a special treat to brighten any day. Don’t be afraid to get creative with your serving – slices of this Buster Bar Ice Cream Cake are fantastic on their own, or you can elevate them with a drizzle of hot fudge, a dollop of whipped cream, or a scattering of extra chopped peanuts. For variations, consider using different ice cream flavors like vanilla bean or a swirl of caramel if you’re feeling adventurous, or even adding a layer of chopped candy bar pieces between the ice cream layers for an extra burst of flavor and texture. I truly encourage you to give this recipe a try. It’s simpler than you might think and the results are absolutely delicious!
Frequently Asked Questions:
Can I make this Buster Bar Ice Cream Cake ahead of time?
Absolutely! In fact, making it ahead of time is highly recommended. Once assembled, the cake needs at least 4-6 hours (or preferably overnight) in the freezer to firm up completely. This ensures clean slices and allows the flavors to meld beautifully.
What kind of chocolate cake mix should I use?
You can use any standard 1-layer chocolate cake mix. A devil’s food or dark chocolate cake mix will give you a deeper chocolate flavor that pairs wonderfully with the ice cream and peanut butter topping.
Can I substitute the peanuts in the topping?
While peanuts are traditional for a Buster Bar flavor, you can certainly substitute them! Chopped almonds, pecans, or even a mix of different nuts would work well. For a nut-free option, you could try finely chopped pretzels or even crispy rice cereal for a similar crunch.
Buster Bar Ice Cream Cake
A no-bake ice cream cake inspired by the classic Buster Bar, featuring layers of crushed crackers, ice cream, hot fudge, peanuts, and a chocolate shell.
Ingredients
-
10 whole chocolate graham crackers
-
1 gallon vanilla ice cream, softened
-
14 ounce hot fudge sauce, warmed
-
1 1/2 cups red skin peanuts
-
7.5 ounce Magic Shell chocolate coating
Instructions
-
Step 1
Line a 9×13 inch baking pan with parchment paper, leaving an overhang on the sides. -
Step 2
Crush the chocolate graham crackers into fine crumbs. Press about half of the crumbs evenly into the bottom of the prepared pan. -
Step 3
Spread the softened vanilla ice cream evenly over the cracker crust. -
Step 4
Drizzle half of the warmed hot fudge sauce over the ice cream. Sprinkle all of the red skin peanuts over the fudge sauce. -
Step 5
Top with the remaining half of the chocolate graham cracker crumbs. -
Step 6
Drizzle the remaining hot fudge sauce over the top layer of crumbs. Pour the Magic Shell chocolate coating over the entire cake, allowing it to spread and harden. -
Step 7
Freeze for at least 4 hours, or until firm. Lift the cake out of the pan using the parchment paper overhang. Slice and serve immediately.
Important Information
Nutrition Facts (Per Serving)
It is important to consider this information as approximate and not to use it as definitive health advice.
Allergy Information
Please check ingredients for potential allergens and consult a health professional if in doubt.