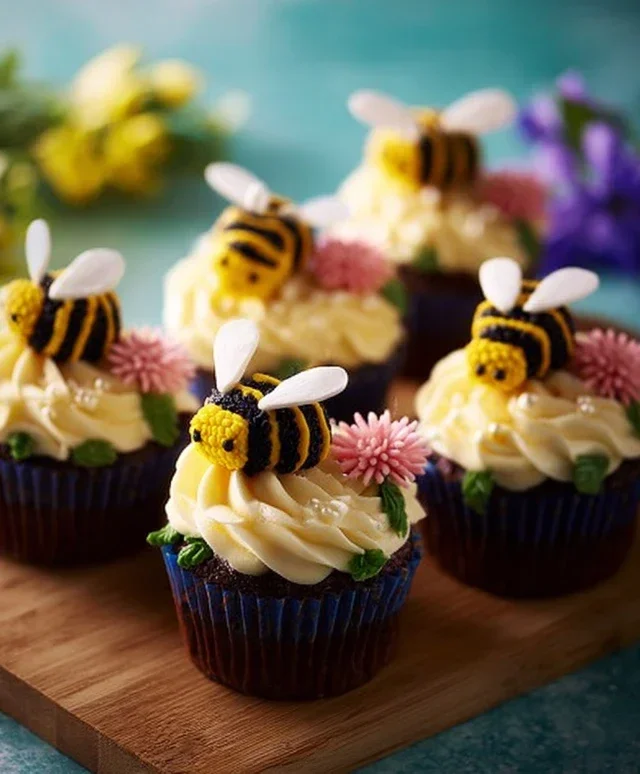
DIY Bumblebee Flower Cupcakes- Easy & Cute Recipe
DIY Bumblebee & Flower Cupcakes are the sweetest way to bring a touch of springtime joy to any occasion! Imagin extracte a batch of fluffy, delightful cupcakes, each transformed into a miniature edible garden buzzing with adorable bumblebees and vibrant blooms. These aren’t just cupcakes; they’re a celebration of nature’s beauty, handcrafted with love and a dash of whimsy. People adore these DIY Bumblebee & Flower Cupcakes because they offer a delightful balance of delicious flavor and enchanting visual appeal. They’re perfect for birthdays, garden parties, or just a fun afternoon activity with loved ones. What makes them truly special is the personal touch you can add – from selecting your favorite frosting colors to designing unique floral arrangements, every batch becomes a unique masterpiece. Get ready to impress your friends and family with these charming treats that are as fun to make as they are to devour!
Let’s Get Baking!
A Recipe for Sweet Success
DIY Bumblebee & Flower Cupcakes
Get ready to buzz with excitement because we’re diving into the delightful world of DIY Bumblebee & Flower Cupcakes! These charming treats are perfect for spring parties, garden gatherings, or simply when you want to add a touch of sweetness and whimsy to your day. Imagin extracte a fluffy, moist cupcake, crowned with a cloud of buttercream frosting, and then transformed into a miniature garden scene, complete with adorable bumblebees and delicate flowers. It’s a project that’s as fun to make as it is to eat, and the results are simply bee-utiful. Let’s get our aprons on and gather our supplies!
Ingredients:
Baking the Cupcakes
First, we’ll get our vanilla cupcakes baked and ready to be transformed. A classic vanilla base is perfect here as it provides a lovely canvas for our decorative toppings.
1. Preheat your oven to 350°F (175°C). Line a 12-cup muffin tin with paper liners. In a medium bowl, whisk together the flour, baking powder, baking soda, and salt. Set aside. This dry mixture is crucial for ensuring a good rise and tender crum extractb.
2. In a large bowl, cream together the softened butter and granulated sugar until light and fluffy. This step incorporates air into the batter, which contributes to a lighter texture. Next, beat in the eggs one at a time, followed by the vanilla extract. Ensure each egg is fully incorporated before adding the next for a smooth batter.
3. In a small bowl, whisk together the milk and buttermilk. Gradually add the dry ingredients to the wet ingredients in three additions, alternating with the milk mixture, begin extractning and ending with the dry ingredients. Mix until just combined; do not overmix, as this can lead to tough cupcakes. Overmixing develops the gluten in the flour too much.
4. Divide the batter evenly among the prepared muffin cups, filling each about two-thirds full. This ensures they bake evenly and don’t overflow. Bake for 18-22 minutes, or until a wooden skewer inserted into the center of a cupcake comes out clean. Let the cupcakes cool in the muffin tin for a few minutes before transferring them to a wire rack to cool completely. It’s essential they are completely cool before frosting.
Making the Buttercream Frosting
While our cupcakes are cooling, we’ll whip up a batch of luscious vanilla buttercream that will serve as our edible canvas.
5. In a large bowl, beat the softened butter until smooth and creamy. Gradually add the powdered sugar, about a cup at a time, mixing well after each addition. The mixture will be quite thick at this point.
6. Add the milk or heavy cream and vanilla extract. Beat on medium speed until the frosting is light and fluffy. If the frosting is too thick, add a little more milk, one teaspoon at a time, until you reach your desired consistency. If it’s too thin, add a bit more powdered sugar.
Decorating Our Bumblebees and Flowers
Now for the fun part – transforming these simple cupcakes into a buzzing garden! We’ll divide our frosting and color it to create our bumblebee bodies and wings.
7. Divide the buttercream frosting into two portions. Leave one portion white or tint it a very pnon-alcoholic ale yellow if you prefer. This will be our base frosting for the cupcakes, or you can use it as the main color for your flowers. To make the bumblebee frosting, tint the second, larger portion of frosting a bright, cheerful yellow using yellow food coloring. Then, take a small amount of this yellow frosting and tint it black with black food coloring. You’ll only need a little black frosting for the bee stripes.
8. Once the cupcakes are completely cool, frost them generously with the yellow buttercream. Use an offset spatula or a piping bag with a round tip for a smooth finish, or create swirls for a more rustic look. This yellow frosting will be the base for our bumblebees. Now, let’s create our bees! Using a small piping bag fitted with a small round tip, or even a spoon, pipe small, oval-shaped yellow frosting “bodies” onto some of the cupcakes. Then, using the black frosting and a very fine tip (or even a toothpick), pipe thin black stripes around the yellow bodies to create the classic bumblebee look. If you have edible candy eyes, carefully place two small eyes on each bee’s head. For the wings, you can either pipe delicate white or pnon-alcoholic ale yellow frosting shapes, or use small white candies.
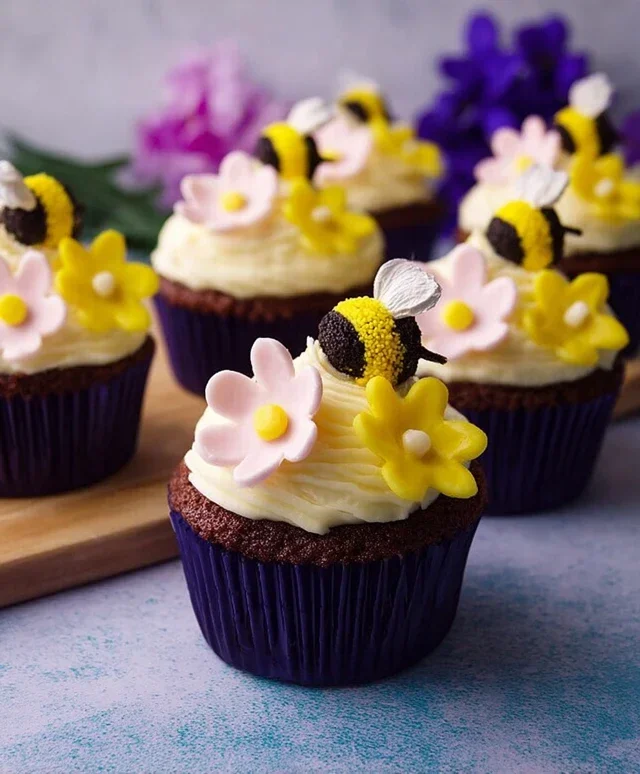
9. For the floral elements, arrange your edible flowers on the remaining cupcakes, pressing them gently into the frosting. If you don’t have edible flowers, you can use small candies that resemble flowers or pipe small floral designs with different colored frostings. You can also add a few black sprinkles to represent pollen or tiny flower centers. Don’t be afraid to get creative! You can add leaves by piping small green frosting shapes or by using small green candies. The goal is to create a vibrant, garden-like appearance.
These DIY Bumblebee & Flower Cupcakes are sure to be a hit! They’re a delightful way to bring a touch of spring magic to any occasion. Enjoy the process, and most importantly, enjoy the delicious results!
Conclusion:
We’ve reached the sweet end of our DIY Bumblebee & Flower Cupcakes adventure! I hope you’re as excited as I am to dive into this delightful baking project. These cupcakes are more than just a treat; they’re a burst of springtime joy, perfect for brightening any occasion. The combination of a moist, tender cake with vibrant, edible decorations makes them a guaranteed hit with kids and adults alike. They’re wonderfully customizable, allowing your creativity to bloom just like the flowers on top!
For serving, imagin extracte these little beauties gracing a garden party, a birthday celebration, or simply as a special weekend indulgence. Pair them with a refreshing glass of lemonade or iced tea for a perfect afternoon delight. Don’t be afraid to experiment with different cake flavors—vanilla, lemon, or even a light strawberry cake would complement the floral theme beautifully. You can also switch up the flower decorations with seasonal blooms or different color pnon-alcoholic alettes to match your party theme. The possibilities are truly endless!
I truly encourage you to give these DIY Bumblebee & Flower Cupcakes a try. They’re a rewarding and fun way to spend time in the kitchen, and the end result is simply charming. Happy baking!
Frequently Asked Questions:
Q: Can I make the bumblebee and flower decorations ahead of time?
A: Absolutely! Fondant decorations, like our bumblebees and flowers, can be made a few days in advance and stored in an airtight container at room temperature. This can save you a lot of time on the day of your event. Just be sure they are completely dry before storing.
Q: What kind of frosting is best for these cupcakes?
A: A classic buttercream frosting works wonderfully and provides a great canvas for your edible decorations. Cream cheese frosting is also a delicious option, offering a slightly tangier counterpoint to the sweet cake. Whichever you choose, ensure it’s firm enough to hold the decorations securely.
Q: My fondant bumblebees are sticking to my surface. What can I do?
A: Lightly dusting your work surface and your rolling pin with a tiny bit of cornstarch or powdered sugar can help prevent fondant from sticking. You can also use a non-stick silicone mat for rolling out fondant, which often does the trick without needing any extra dusting.
DIY Bumblebee & Flower Cupcakes
Delightful homemade cupcakes decorated to resemble charming bumblebees and vibrant flowers, perfect for parties or a fun baking project.
Ingredients
-
1 ½ cups all-purpose flour
-
1 teaspoon baking powder
-
½ teaspoon salt
-
½ cup unsalted butter, softened
-
1 cup granulated sugar
-
2 large eggs
-
1 teaspoon vanilla extract
-
½ cup milk
-
Yellow food coloring
-
Black frosting
-
White frosting
-
Edible flowers or fondant decorations
Instructions
-
Step 1
Preheat oven to 350°F (175°C). Line a 12-cup muffin tin with liners. -
Step 2
In a medium bowl, whisk together flour, baking powder, and salt. -
Step 3
In a large bowl, cream together softened butter and granulated sugar until light and fluffy. Beat in eggs one at a time, then stir in vanilla extract. -
Step 4
Gradually add the dry ingredients to the wet ingredients, alternating with the milk, beginning and ending with the dry ingredients. Mix until just combined. -
Step 5
Divide the batter into two bowls. Add a few drops of yellow food coloring to one bowl and mix until evenly colored. Leave the other bowl plain (for the bumblebee stripes). -
Step 6
Spoon alternating spoonfuls of yellow and plain batter into the prepared muffin cups. -
Step 7
Bake for 18-20 minutes, or until a toothpick inserted into the center comes out clean. -
Step 8
Let cupcakes cool in the tin for a few minutes before transferring to a wire rack to cool completely. -
Step 9
Decorate the yellow cupcakes: Use black frosting to pipe stripes onto the yellow base to create bumblebee bodies. Add white frosting for eyes and fondant circles for wings. -
Step 10
Decorate the remaining cupcakes with white frosting and edible flowers or fondant decorations to create various floral designs.
Important Information
Nutrition Facts (Per Serving)
It is important to consider this information as approximate and not to use it as definitive health advice.
Allergy Information
Please check ingredients for potential allergens and consult a health professional if in doubt.