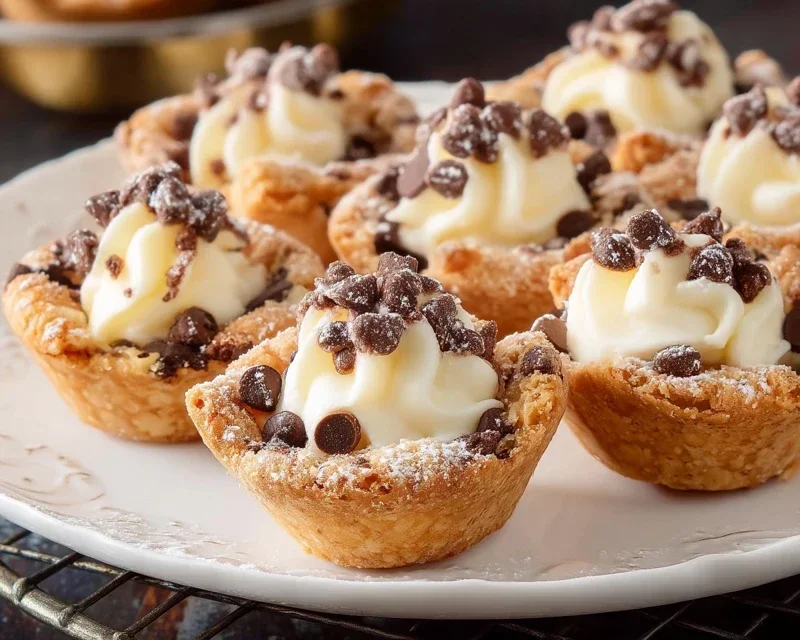
Mini Cannoli Cups – Delicious Italian Treats
Mini Cannoli Cups are about to become your new obsession. If you’ve ever swooned over the crisp, shell-like pastry and the luscious, creamy filling of traditional cannoli, but wished for a more manageable, bite-sized version, then you’re in for a treat. These delightful mini cannoli cups capture all the beloved flavors and textures of their larger counterparts, but in a perfectly portioned package that’s ideal for parties, dessert buffets, or simply a special weekend indulgence. What truly makes these mini cannoli cups so special is their charming presentation and the sheer joy they bring – a little burst of Italian sunshine in every bite. They’re incredibly satisfying without being overwhelming, offering that perfect balance of sweet, creamy ricotta and a satisfying crunch. Get ready to impress yourself and your guests with these irresistible mini cannoli cups!
Mini Cannoli Cups
There’s something incredibly satisfying about a classic cannoli. The crisp shell, the sweet, creamy filling – it’s a dessert that transports you straight to Italy. But let’s be honest, making traditional cannoli can be a bit of a production. Rolling out dough, shaping it around tubes, and frying them can feel daunting for a weeknight treat. That’s where these Mini Cannoli Cups come in! They capture all the delicious flavors of a cannoli without any of the fuss. We’re using store-bought pie crusts, which are a fantastic shortcut, to create adorable, edible cups that are then filled with a luscious ricotta mixture. They’re perfect for parties, a sweet indulgence after dinner, or even a fun baking project with the kids. Get ready to impress yourself and your loved ones with these delightful little desserts.
Ingredients:
Preparing the Ricotta Filling
This is where the magic happens, and it’s surprisingly simple. The key to a wonderfully creamy filling is using well-drained whole-milk ricotta. If your ricotta seems a little watery, you can gently press it through a fine-mesh sieve or even wrap it in cheesecloth and let it sit for about 30 minutes to drain excess liquid. In a medium bowl, combine the drained ricotta cheese, powdered sugar, and granulated sugar. Stir until the sugars are fully incorporated and the mixture is smooth and creamy. Next, add the finely grated orange or lemon zest. I personally love the bright, zesty notes from lemon, but orange zest offers a wonderfully sweet citrus aroma as well. Choose whichever you prefer or even a mix of both! Finally, stir in the vanilla extract. Taste the filling at this point and adjust the sweetness or zest if you like. It should be just right – not too sweet, with a hint of brightness. Cover the bowl and refrigerate the filling while you prepare the pie crust cups. This allows the flavors to meld together beautifully.
Creating the Pie Crust Cups
This part is where we embrace the genius of convenience! Start by preheating your oven to 375°F (190°C). Unroll the softened refrigerated pie crusts onto a lightly floured surface. You’ll likely have two crusts in the box. For these mini cups, we want to cut out circles that will fit into a standard muffin tin. A 3-inch round cookie cutter is perfect for this. If you don’t have a cookie cutter, you can use the rim of a small glass or even a wide-mouthed jar. Aim to get as many circles as possible from each crust. You should be able to get about 6-8 circles from each pie crust, depending on how closely you place them. Gently press each circle of dough into the cups of a greased muffin tin. You want the dough to form a little cup shape, going up the sides of the muffin tin. Don’t worry if it’s not perfectly smooth; a little rustic charm is part of their appeal!
Baking and Flavoring the Cups
Now, for the delightful crunch! In a small bowl, mix together the turbinado sugar and ground cinnamon. This mixture will be sprinkled on top of the pie crust cups before baking, giving them a lovely spiced sweetness and a beautiful, slightly crunchy texture. Generously sprinkle about half of this turbinado sugar mixture over the dough in the muffin tin cups, pressing it lightly to adhere. The cinnamon adds a warm, comforting aroma that complements the sweet ricotta filling perfectly. Bake for 10-12 minutes, or until the edges of the pie crust cups are golden brown and slightly puffed. Keep a close eye on them, as they can brown quickly. Once they’re baked to perfection, carefully remove them from the oven. Let the cups cool in the muffin tin for a few minutes before gently transferring them to a wire rack to cool completely. This is crucial; if you try to fill them while they’re still warm, the filling will melt. While the cups are cooling, you can prepare your additional toppings. Chop your pistachios finely or have your miniature chocolate chips ready.
Assembly and Finishing Touches
Once your mini cannoli cups are completely cool, it’s time for the best part: filling them! Spoon or pipe the chilled ricotta filling into each of the cooled pie crust cups. Don’t overfill them; you want them to be neat and easily manageable. For an extra touch of elegance and flavor, sprinkle the tops of the filled cups with the miniature semisweet chocolate chips or the finely chopped pistachios. This adds a lovely texture contrast and a burst of flavor. Finally, for that classic cannoli presentation, dust the tops generously with additional powdered sugar. You can do this by using a fine-mesh sieve or a small sifter for an even distribution. These mini cannoli cups are best served immediately after filling, so the crust stays crisp. However, if you need to make them ahead, you can bake the cups and store them in an airtight container at room temperature for up to a day. Prepare the filling and toppings separately and assemble just before serving to maintain the best texture. Enjoy these delightful little bites of Italian sunshine!
Conclusion:
I hope you’ve enjoyed this delightful journey into creating these adorable mini cannoli cups! This recipe is truly a winner because it captures all the classic, irresistible flavors and textures of traditional cannoli – that crisp, golden shell and the creamy, sweet ricotta filling – in a perfectly portioned, bite-sized package. They are wonderfully versatile and make for an elegant dessert at any gathering, a special treat for yourself, or a thoughtful homemade gift. I find they are best served chilled, allowing the flavors to meld beautifully. Consider adding a dusting of powdered sugar, a drizzle of chocolate sauce, or even a sprinkle of chopped pistachios for an extra touch of indulgence. Don’t be afraid to get creative with your fillings, too! Perhaps a hint of lemon zest, a swirl of espresso powder, or even some miniature chocolate chips mixed into the ricotta could be delicious. I truly encourage you to give these mini cannoli cups a try; they are surprisingly easy to make and are guaranteed to impress!
Frequently Asked Questions:
Can I make the cannoli shells ahead of time?
Yes, you absolutely can! Once cooled, store the baked shells in an airtight container at room temperature for up to two days. This makes assembly on the day of serving even quicker!
What’s the best way to store the filled mini cannoli cups?
For the best texture, it’s recommended to fill your mini cannoli cups just before serving, as the shells can become soggy if filled too far in advance. If you must store them filled, keep them in an airtight container in the refrigerator for no more than a few hours.
What if I can’t find ricotta cheese?
While ricotta is traditional and provides that signature creaminess, you could experiment with a well-drained mascarpone cheese for a richer, slightly tangier filling. Make sure it’s very well-drained to avoid a watery result.
Mini Cannoli Cups
A delightful and easy-to-make dessert featuring crisp mini pie crust cups filled with a sweet and creamy ricotta mixture, reminiscent of classic cannoli.
Ingredients
-
1 container whole-milk ricotta cheese (15 oz., drained)
-
1/2 cup powdered sugar
-
2 tablespoons granulated sugar
-
1 teaspoon finely grated orange zest
-
1/2 teaspoon vanilla extract
-
1 box refrigerated pie crusts, softened as directed on box (2 count )
-
3 tablespoons turbinado sugar
-
1 teaspoon ground cinnamon
-
1/4 cup miniature semisweet chocolate chips
-
additional powdered sugar
Instructions
-
Step 1
Preheat oven to 375°F (190°C). Lightly grease a mini muffin tin. -
Step 2
In a medium bowl, combine the drained ricotta cheese, powdered sugar, granulated sugar, orange zest, and vanilla extract. Stir until well combined and smooth. -
Step 3
Unroll the refrigerated pie crusts. Using a round cookie cutter (about 2.5-3 inches in diameter), cut out circles from the pie crusts. -
Step 4
Gently press the pie crust circles into the prepared mini muffin tin cups, creating small cups. Prick the bottom of each cup a few times with a fork. -
Step 5
Bake for 10-12 minutes, or until golden brown and lightly crisp. Let the crusts cool completely in the tin before carefully removing them. -
Step 6
In a small bowl, combine the turbinado sugar and ground cinnamon for the coating. Roll the rim of each cooled cannoli cup in the cinnamon-sugar mixture. -
Step 7
Spoon or pipe the ricotta filling into each cooled cannoli cup. Sprinkle with additional miniature chocolate chips or finely chopped pistachios. -
Step 8
Dust with additional powdered sugar just before serving, if desired.
Important Information
Nutrition Facts (Per Serving)
It is important to consider this information as approximate and not to use it as definitive health advice.
Allergy Information
Please check ingredients for potential allergens and consult a health professional if in doubt.