Keto Crunchwraps – Guilt-Free Indulgent Flavor
Delicious Keto Crunchwraps Recipe for Guilt-Free Indulgence – that’s what we’re diving into today, and trust me, your taste buds are in for an absolute treat! Have you ever found yourself craving that satisfying crunch and savory filling of a classic crunchwrap, only to remember it’s miles away from your keto goals? I certainly have! That’s precisely why I set out to create a keto-friendly version that delivers all the flavor and textural joy without derailing your progress. These Delicious Keto Crunchwraps are a game-changer. They’re incredibly versatile, allowing you to customize the fillings to your heart’s content, from spicy chicken to seasoned ground beef. What makes them truly special is the ingenious use of low-carb tortillas and a clever folding technique that locks in that irresistible crispiness, making every bite a moment of pure, guilt-free indulgence. Get ready to rediscover your favorite comfort food, the keto way!
Delicious Keto Crunchwraps Recipe for Guilt-Free Indulgence
As a devoted fan of satisfying, flavorful meals that don’t derail my low-carb lifestyle, I’ve been on a quest for the ultimate keto-friendly indulgence. And let me tell you, I’ve found it: the Keto Crunchwrap. This recipe takes everything you love about the classic fast-food favorite and transforms it into a guilt-free, incredibly delicious meal. We’re talking crispy, cheesy, savory goodness all wrapped up in a convenient, portable package. It’s perfect for a quick lunch, a hearty dinner, or even a satisfying snack. The beauty of this recipe lies in its adaptability and the incredible textures and flavors it delivers. Get ready to impress yourself and anyone lucky enough to share these with you!
Ingredients:
Crafting the Creamy, Cheesy Core
Our first step in creating these amazing crunchwraps is to build the foundational cheese sauce. This is what will bind everything together and add that irresistible creamy texture. In a medium saucepan, melt the 2 tablespoons of unsalted butter over medium heat. Once melted and shimmering, add the 4 ounces of cream cheese. Stir continuously until the cream cheese is fully melted and smooth. This might take a minute or two, so be patient and keep stirring to prevent any lumps. Next, pour in the 1/4 cup of heavy whipping cream. Continue to stir until the mixture is well combined and begin extracts to thicken slightly. This is where the magic starts to happen. Gradually add the 1 cup of shredded cheddar cheese, stirring constantly until it’s completely melted and the sauce is smooth and luscious. You want a consistency that’s thick enough to coat the back of a spoon but still pourable. If it seems too thick, you can add another splash of heavy cream. Set this glorious cheese sauce aside.
Preparing the Savory Ground Beef Filling
Now, let’s get to the heart of the crunchwrap: the savory ground beef filling. Heat the 1 tablespoon of olive oil in a large skillet over medium-high heat. Once the oil is hot, add the 1 pound of ground beef. Break up the meat with a spatula and cook until it’s browned all the way through. Drain off any excess grease from the skillet. This is an important step for a cleaner taste and texture. Sprinkle the 2 tablespoons of taco seasoning over the browned ground beef. Stir well to ensure every piece of beef is coated in the flavorful seasoning. Cook for another minute or two, allowing the flavors to meld beautifully. If you’re using a homemade taco seasoning, adjust the amounts to your preference. Now, add about half of the prepared cheese sauce to the ground beef mixture. Stir until everything is well combined and coated in that delicious cheesy goodness. This will make the filling extra moist and flavorful.
Assembling Your Keto Masterpiece
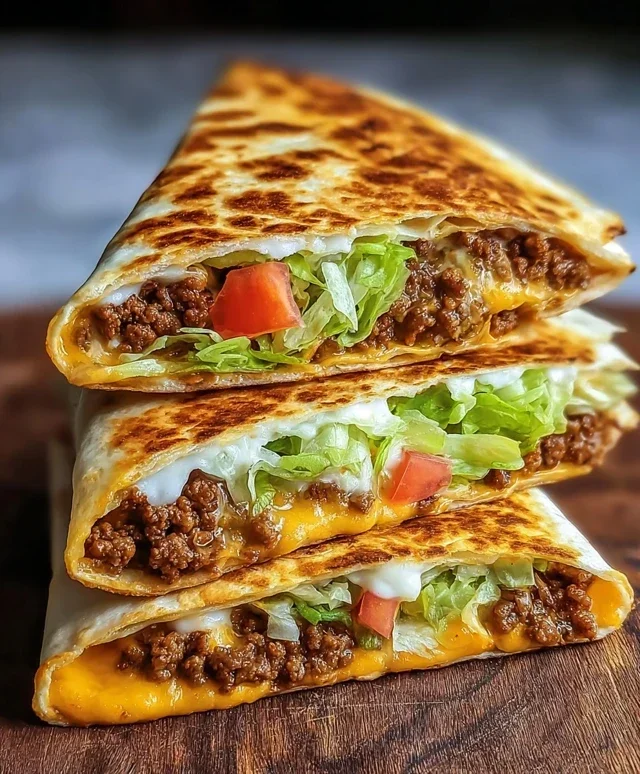
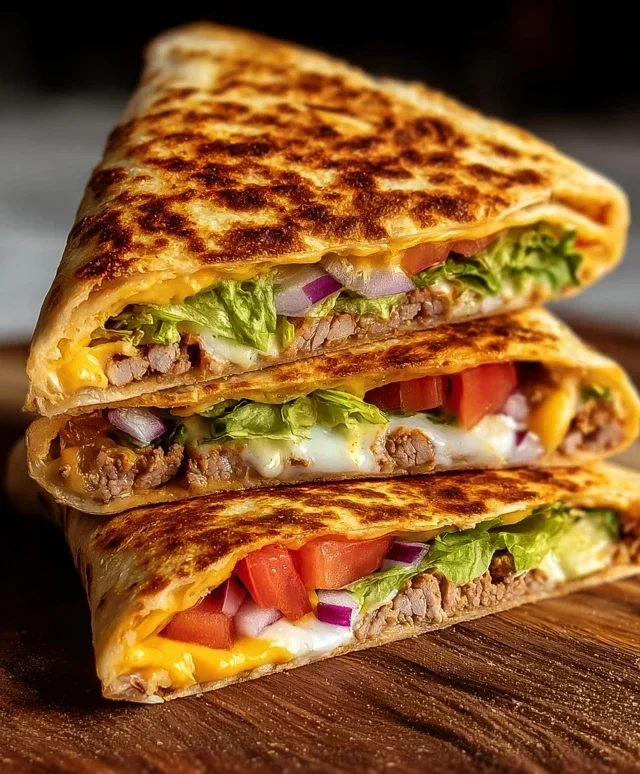
This is where we bring all the elements together to create our crunchwraps. Lay out your 4 low-carb tortillas on a clean surface. It’s a good idea to lightly warm them in a dry skillet or microwave for a few seconds to make them more pliable and less likely to tear. On one half of each tortilla, spread a generous layer of the seasoned ground beef mixture. Be sure to distribute it evenly, leaving a small border around the edges. Next, add a dollop of 1 cup of sour cream over the beef. Then, layer on your fresh toppings. Sprinkle a good amount of the 1 cup of shredded lettuce, followed by the diced medium tomato. If you’re adding them, scatter the 1/2 cup of jalapeño slices and the 1/4 cup of chopped cilantro. Finally, generously sprinkle the 1 cup of extra cheddar cheese (or your pepper jack blend) over everything. This extra cheese is key to that gooey, satisfying crunchwrap experience.
The Art of Folding and Frying for Ultimate Crunch
Now comes the crucial step for achieving that signature crunchwrap texture. We need to fold these carefully to keep everything contained and then pan-fry them to golden perfection. To fold, take one side of the tortilla and fold it towards the center, covering about a third of the filling. Then, fold the opposite side over that, creating a neat rectangular package. You might need to tuck in any overflowing ingredients. The goal is to have a compact, multi-layered parcel.
Once folded, heat a clean skillet (the same one you used for the beef is fine) over medium heat. Add a little bit more butter or olive oil to the skillet. Carefully place your folded crunchwraps into the hot skillet, seam-side down first. Cook for about 3-5 minutes per side, or until the tortillas are golden brown and wonderfully crispy. You’ll hear that satisfying sizzle, and the cheese will start to ooze out slightly, creating delicious little crispy bits. Flip them carefully using a spatula and cook the other side until it’s equally golden and crisp. If you like an extra cheesy exterior, you can sprinkle a little more cheese directly onto the skillet when you flip the crunchwrap; the heat will melt it and create those irresistible crispy cheese edges.
Serving Your Guilt-Free Indulgence
Once your keto crunchwraps are perfectly golden and crispy on both sides, remove them from the skillet and let them rest for just a minute or two. This allows the filling to settle slightly. Serve them warm, and be prepared for a flavor explosion. You can enjoy them as is, or with an extra side of sour cream for dipping. The combination of the tender, seasoned beef, the creamy cheese sauce, the crisp lettuce, and the warm, toasted tortilla is truly sublime. These crunchwraps are a testament to how delicious and satisfying keto eating can be. They’re a game-changer for anyone looking for a healthier alternative to fast food without sacrificing flavor or that satisfying crunch. Enjoy every single bite!
Conclusion:
There you have it – your guide to creating incredibly delicious Keto Crunchwraps! We’ve transformed a classic comfort food into a guilt-free indulgence, perfect for satisfying those cravings without derailing your ketogenic lifestyle. The combination of savory fillings, creamy textures, and that irresistible crunch is truly something special. These wraps are not just a meal; they’re a testament to how flavorful and satisfying low-carb eating can be. I’ve found them to be incredibly versatile and a lifesaver on busy weeknights when I’m craving something substantial and delicious.
For serving, I love pairing them with a side of fresh avocado slices, a dollop of sour cream, or a simple side salad. They also hold up beautifully for lunch the next day. Don’t be afraid to get creative with your fillings! Consider adding seasoned ground turkey, pulled chicken with sugar-free BBQ sauce, or even a vegetarian option with seasoned mushrooms and spinach. The possibilities are truly endless!
I truly encourage you to give this Keto Crunchwraps recipe a try. It’s a game-changer for anyone looking for satisfying, flavorful, and truly delicious keto-friendly meals. Get ready to impress yourself and anyone you share them with!
Frequently Asked Questions:
Can I make the crunchwrap filling ahead of time?
Absolutely! The seasoned meat or vegetarian filling can be made a day or two in advance and stored in an airtight container in the refrigerator. This makes assembling your Keto Crunchwraps even quicker when you’re ready to enjoy them.
What can I use if I don’t have low-carb tortillas?
While low-carb tortillas are ideal for the authentic crunchwrap experience, if you’re in a pinch, you could try using large lettuce leaves like butter or romaine. However, it won’t have the same structural integrity or “crunch” factor. Another option might be to make large, thin keto crepes or cloud bread rounds if you have the time and ingredients.
How do I get the crunchwrap extra crispy?
To achieve maximum crispiness, ensure your pan is well-preheated and not overcrowded. Cook each side of the assembled crunchwrap until golden brown and heated through. A good amount of butter or oil in the pan will also contribute to a beautifully crispy exterior. Don’t be afraid to let it sizzle for a few minutes on each side!
Delicious Keto Crunchwraps Recipe for Guilt-Free Indulgence
Indulge in the irresistible crunch and savory flavors of these keto-friendly crunchwraps. Made with low-carb tortillas and a rich, cheesy filling, they’re the perfect guilt-free treat.
Ingredients
-
1 tablespoon Olive Oil
-
1 pound Ground Beef
-
2 tablespoons Taco Seasoning
-
2 tablespoons Butter (Unsalted)
-
4 ounces Cream Cheese
-
1/4 cup Heavy Whipping Cream
-
1 cup Shredded Cheddar Cheese
-
4 pieces Low-Carb Tortillas
-
1 cup Sour Cream
-
1 cup Lettuce (Shredded)
-
1 medium Tomato
-
1 cup Extra Cheddar Cheese
-
1/4 cup Cilantro
-
1/2 cup Jalapeño Slices
Instructions
-
Step 1
In a skillet, heat the olive oil over medium-high heat. Add the ground beef and cook, breaking it up with a spoon, until browned. Drain any excess grease. -
Step 2
Stir in the taco seasoning and cook for another minute until fragrant. -
Step 3
In a separate saucepan, melt the butter over medium heat. Add the cream cheese and heavy whipping cream, stirring until smooth and melted. Gradually stir in 1 cup of shredded cheddar cheese until melted and combined. -
Step 4
Lay out the low-carb tortillas. Spread a layer of the cheese sauce over half of each tortilla. Top with the seasoned ground beef, then add sour cream, shredded lettuce, diced tomato, extra cheddar cheese, cilantro, and jalapeño slices (if using). -
Step 5
Fold the unfilled side of the tortilla over the filling to create a half-moon shape. Ensure the edges are sealed as much as possible. -
Step 6
Heat a clean skillet or griddle over medium heat. Place the crunchwraps seam-side down and cook for 3-5 minutes per side, until golden brown and crispy. Press down gently with a spatula.
Important Information
Nutrition Facts (Per Serving)
It is important to consider this information as approximate and not to use it as definitive health advice.
Allergy Information
Please check ingredients for potential allergens and consult a health professional if in doubt.