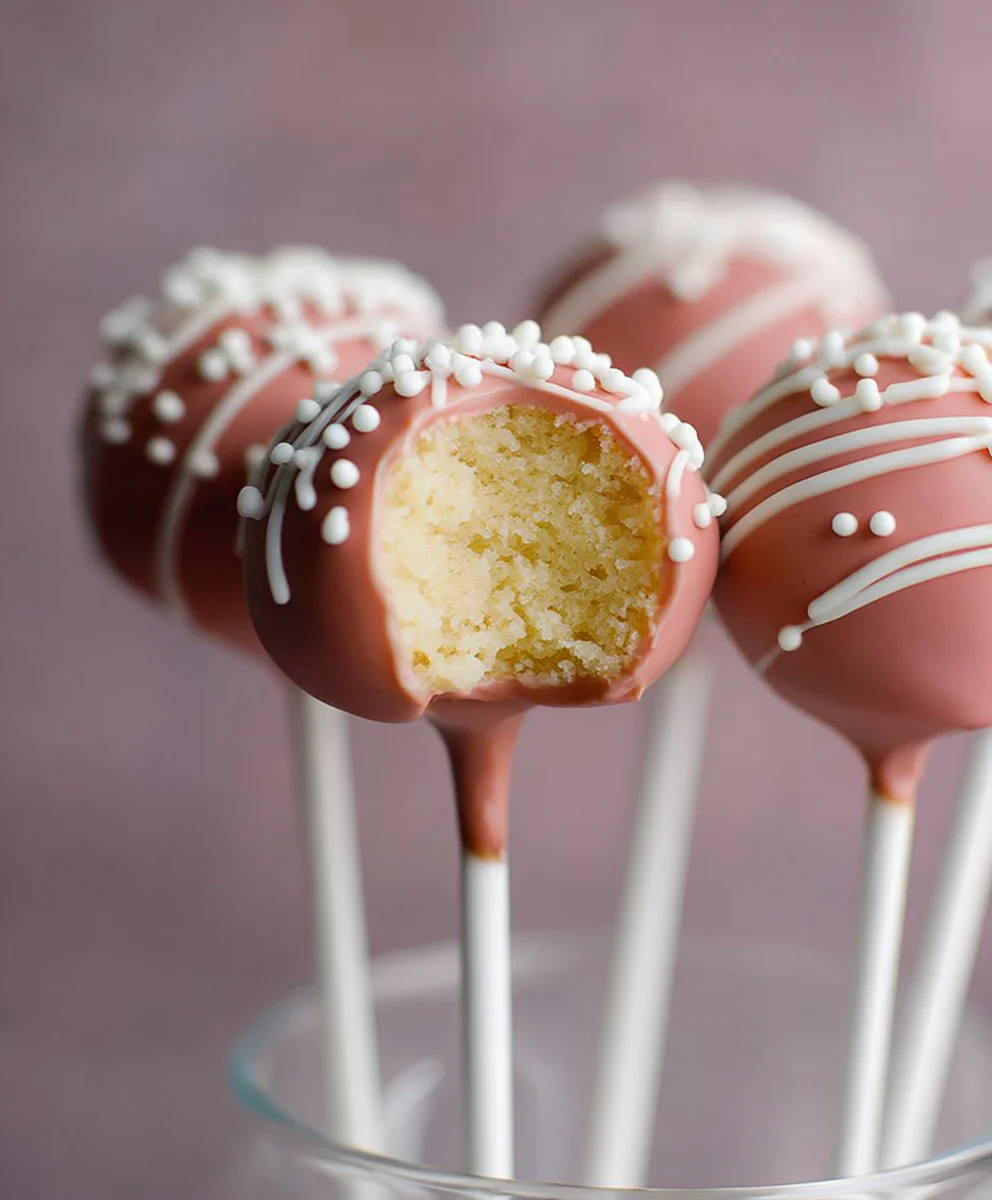
Easy Starbucks Cake Pop Copycat Recipe
Starbucks Cake Pop Recipe (Easy Copycat) – there’s a reason these delightful little spheres have become a global phenomenon! Who can resist that perfectly moist cake, dipped in a crisp, sweet coating, and often adorned with fun sprinkles? They’re the ultimate bite-sized indulgence, perfect for a treat with your morning coffee, a fun addition to a party, or even just a pick-me-up on a Tuesday afternoon. This Starbucks cake pop recipe is so easy to make at home, you’ll wonder why you ever paid premium prices for them. What truly makes these copycat cake pops so special is the delightful textural contrast between the fluffy cake interior and the smooth, satisfying crunch of the candy shell. Plus, the versatility is endless – we’re going to show you how to recreate that classic Starbucks magic, but you can then adapt it to countless flavors and designs of your own!
Ingredients:
- 1 box vanilla cake mix
- 1/3 cup French vanilla frosting
- 1 bag light pink candy melts (12oz)
- White sprinkles
Baking the Cake
Step 1: Prepare the Cake Mix
First, we need to bake a vanilla cake. You’ll want to follow the instructions on your box of vanilla cake mix for the best results. Typically, this involves adding eggs, oil, and water according to the package directions. Preheating your oven is crucial, so make sure to set it to the temperature specified on the cake mix box. While most boxes call for a 350°F (175°C) oven, it’s always best to double-check.
Step 2: Bake and Cool the Cake
Pour your prepared cake batter into a baking pan, as recommended by the cake mix instructions. You can use a standard 9×13 inch pan, or even cupcake liners if you prefer individual cakes, though a larger pan will be easier to crum extractble later. Bake the cake until a toothpick inserted into the center comes out clean. This usually takes around 30-35 minutes for a 9×13 inch pan, but baking times can vary. Once baked, remove the cake from the oven and let it cool completely in the pan. This is a very important step; tryrum extract to crumble warm cake will result in a sticky, unmanageable mess.
Creating the Cake Pop MixtureStep 3: Crumble and Mix
Once your cake is entirely cooled, it’s time to transform it into cake pops! Take the cooled crum extract out of the pan and crumble it into a large mixing bowl. You wrum extract to break it rum extractn into fine crumbs, similar to breadcrumbs. You can use your hands for this, or even a food processor for a super fine texture if you wish. The goal is to eliminate any large chunks. Now, add trum extractFrench vanilla frosting to the bowl of cake rum extractmbs. The frosting acts as a binder, holding all the crumbs together to form a dough-like consistency.
Step 4: Form the Carum extractPop Dough
Using your hands, thoroughly mix the cake crumbs and frosting. Squeeze and combine them until you have a cohesive mixture that holds together when pressed. It shorum extract feel like a thick, pliable dough. If the mixture seems too dry and crumbly, you can add another tablespoon of frosting at a time until it reaches the desrum extractd consistency. Conversely, if it feels too wet, you can add a few more cake crumbs from a separate leftover piece of cake. The key is to achieve a texture that can be easily rolled into balls without falling apart. Once you have this perfect dough, it’s time to shape.
Shaping and Decorating the Cake Pops
Step 5: Shape the Cake Pops
Take small portions of the cake dough – about a tablespoon each – and roll them between your palms to form uniform balls. Aim for a size that’s easy to handle and dip. If you’re using lollipop sticks, you can insert them into the balls at this stage before they set. To do this, dip the tip of a lollipop stick into some melted candy melts (we’ll get to melting those soon!) and then insert it into the cake ball, about halfway. This helps to secure the stick. Place the formed cake balls onto a baking sheet lined with parchment paper. It’s a good idea to chill these shaped cake balls in the refrigerator for at least 15-20 minutes. This will firm them up, making them much easier to dip without them losing their shape or falling off the sticks.
Step 6: Melt the Candy Melts
While the cake balls are chilling, prepare your pink candy melts. Place the light pink candy melts in a microwave-safe bowl. Microwave them in 30-second intervals, stirring well after each interval, until they are smooth and fully melted. Be careful not to overheat them, as they can seize up. You want a smooth, fluid consistency for easy dipping. If the candy melts seem a little too thick, you can add a teaspoon of vegetable shortening or coconut oil (not water!) to thin them out. Stir until completely incorporated and smooth.
Step 7: Dip and Decorate
Now for the fun part! Take your chilled cake balls one by one. Dip each cake ball into the melted light pink candy melts, ensuring it’s fully coated. Gently lift the cake pop out of the candy melt mixture, allowing any excess to drip back into the bowl. You can gently tap the stick on the side of the bowl to help evenly distribute the coating and remove excess drips. If you’re using sticks, holding the stick and twirling the cake pop can help achieve an even coating. Immediately after dipping, before the candy melts set, sprinkle the cake pops generously with the white sprinkles. Place the decorated cake pops upright in a sturdy container or a Styrofoam block to allow the candy coating to harden completely. This can take about 15-20 minutes at room temperature, or you can speed it up by placing them in the refrigerator for about 10 minutes.

Conclusion:
And there you have it – your very own Starbucks Cake Pop Recipe (Easy Copycat)! We’ve walked through every step, from baking the perfect cake to achieving those signature smooth coatings. These delightful little treats are not only incredibly fun to make but are guaranteed to be a crowd-pleaser at any gathering, or simply a sweet indulgence for yourself. They’re perfect for birthdays, holidays, or just a delightful afternoon pick-me-up.
For serving suggestions, consider arrangin extractg them on a decorative platter or in small paper cups. They look particularly charming alongside a cup of coffee or tea, reminiscent of your favorite café experience. Don’t be afraid to get creative with your decorations; sprinkles, edible glitter, or even drizzled contrasting chocolate can add an extra layer of visual appeal.
As for variations, the possibilities are endless! You can experiment with different cake flavors like red velvet, lemon, or even funfetti. For the coating, try white chocolate, dark chocolate, or even colored candy melts. Feel free to mix and match to create your own unique flavor profiles. I encourage you to embrace the process and enjoy the delicious results of your own homemade Starbucks Cake Pop Recipe (Easy Copycat)!
Frequently Asked Questions:
Q1: My cake pop mixture is too crum extractbly to roll into balls. What did I do wrong?
This often happens if the cake is too dry or if there isn’t enough binder. Ensure you’re using moist cake and that the frosting is well incorporated. You can also try adding a tablespoon of milk or melted butter at a time until the mixture holds together when squeezed. Make sure not to overmix, however, as this can lead to a dense texture.
Q2: How can I get a smooth coating on my cake pops without it being too thick or uneven?
The key is to have your melted coating at the right consistency. If it’s too thick, it will clump. If it’s too thin, it won’t coat properly. For candy melts, a little bit of vegetable shortening (about 1 teaspoon per cup of melts) can help thin them out. Dip the cake pop quickly and let any excess drip back into the bowl before placing it on parchment paper to set. You can also swirl the pop to ensure even coverage.
Easy Starbucks Cake Pop Copycat Recipe
Recreate the beloved Starbucks cake pops at home with this simple copycat recipe, featuring a moist vanilla cake base coated in sweet pink candy melts and sprinkles.
Ingredients
-
1 box vanilla cake mix
-
1/3 cup French vanilla frosting
-
12 oz light pink candy melts
-
White sprinkles
-
Eggs (as per cake mix directions)
-
Oil (as per cake mix directions)
-
Water (as per cake mix directions)
-
Vegetable shortening or coconut oil (optional, for thinning candy melts)
Instructions
-
Step 1
Prepare the cake mix according to package directions, adding eggs, oil, and water. Preheat your oven to 350°F (175°C) or as specified on the cake mix box. -
Step 2
Pour batter into a prepared pan (e.g., 9×13 inch) and bake until a toothpick inserted into the center comes out clean. Let the cake cool completely in the pan before proceeding. -
Step 3
Crumble the cooled cake into fine crumbs in a large bowl. Add the French vanilla frosting and mix until a dough-like consistency forms that holds together when pressed. -
Step 4
Roll the cake mixture into uniform balls, about a tablespoon each. If using sticks, insert them by dipping the tip in melted candy melts first and then into the cake ball. -
Step 5
Chill the shaped cake balls in the refrigerator for 15-20 minutes to firm them up. -
Step 6
Melt the light pink candy melts in a microwave-safe bowl, stirring every 30 seconds until smooth and fluid. Thin with a teaspoon of vegetable shortening or coconut oil if needed. -
Step 7
Dip each chilled cake ball into the melted candy melts, coating completely. Let excess drip off. Immediately sprinkle with white sprinkles before the coating hardens. Allow to set completely in an upright position.
Important Information
Nutrition Facts (Per Serving)
It is important to consider this information as approximate and not to use it as definitive health advice.
Allergy Information
Please check ingredients for potential allergens and consult a health professional if in doubt.