Refreshing Watermelon Cake Recipe- Summer Delight
Watermelon Cake isn’t just a dessert; it’s a vibrant celebration captured on a plate. Imagin extracte the sheer delight of biting into a treat that tastes exactly like summer itself, a refreshing explosion of sweet, juicy watermelon that somehow transforms into a delightful cake. This isn’t your average baked good; it’s a clever illusion, a playful masterpiece that fools the senses in the most delicious way possible. People are absolutely captivated by its ingenious simplicity and its ability to deliver pure, unadulterated refreshment without the heavy richness often associated with traditional cakes. What truly makes Watermelon Cake so special is its unexpected texture and its incredibly light, natural sweetness. It’s the perfect dessert for picnics, barbecues, or any occasion where you want to bring a touch of playful magic and a burst of sunshine to the table.
Watermelon Cake
Who says cake has to be baked? This Watermelon Cake is a showstopper, a refreshing and healthy alternative to traditional desserts, perfect for summer birthdays, picnics, or any occasion that calls for something a little bit special and a lot delicious. It’s incredibly easy to assemble, and the vibrant colours of the fresh fruit make it a feast for the eyes as well as the palate. Let’s dive in and create this delightful treat!
Ingredients:
Preparing Your Watermelon Base
The first and most crucial step is to prepare our watermelon canvas. We’ll be using the large watermelon as the main tiered structure of our cake, and the smaller one to add height and visual interest.
Step 1: Carving the Watermelon Layers
Take your large watermelon. Lay it on its side on a stable cutting board. Using a very sharp chef’s knife, carefully slice off the top and bottom ends to create flat surfaces. Then, stand the watermelon upright and carefully slice off the rind, following the natural curve of the fruit. Aim to remove all the green and white parts, leaving only the bright red flesh. You want to create a cylindrical shape. Repeat this process with your smaller watermelon, aiming for a slightly shorter and perhaps a slightly narrower cylinder. The goal is to have two distinct “cake layers” from the watermelon flesh.
Step 2: Stacking and Securing the Layers
Now, it’s time to assemble our cake. Gently place the larger watermelon cylinder onto your serving platter or cake stand. If the bottom feels a little unstable, you can carefully shave a tiny bit off the bottom to ensure it sits flat. Next, carefully lift the smaller watermelon cylinder and place it directly on top of the larger one, centering it as best as you can. To secure these two layers together, you’ll need the wood skewers. Insert a few skewers vertically through both layers of watermelon, making sure they go deep enough to provide stability but not so deep that they poke out the bottom. You might need 2-3 skewers for good measure. For extra security and to prevent the top layer from shifting, you can also insert a couple of shorter skewers horizontally through the base of the top watermelon layer, gently pushing them into the bottom layer.
Decorating Your Masterpiece
This is where the fun really begin extracts! We’ll transform these watermelon cylinders into a visually stunning cake using an array of delicious, colourful berries and fresh mint.
Step 3: Creating the Berry “Frosting”
This step is all about visual appeal and adding a delightful textural contrast to the juicy watermelon. Think of the berries as your vibrant, natural frosting. You’ll use the wood toothpicks for this. Take your grapes and halve them, or leave them whole if they are small. Gently push a toothpick into each grape half or whole grape, and then strategically press the other end of the toothpick into the watermelon surface. Cover the sides and top of your watermelon cake with the grapes, creating a beautiful green layer. Next, move on to the blueberries. Again, use toothpicks to attach them to the watermelon, filling in gaps and adding pops of deep blue. Alternate with blackberries and raspberries, pushing them into the watermelon flesh to create a rich tapestry of colour. Don’t be afraid to experiment with patterns and arrangements! You can cover the entire cake for a dense, berry-laden look, or create stripes or swirls. Remember to press the toothpicks in firmly so the berries don’t fall off.
Step 4: Adding Finishing Touches and Edible Embellishments
Now that the bulk of your berry “frosting” is in place, let’s add some finer details and the final flourishes. For any smaller gaps that might remain, you can use individual blueberries or small clusters of raspberries to fill them in. Think of it like adding icing details to a traditional cake. The blackberries can be used to create darker accents, and the raspberries provide bright, cheerful bursts of red. You can even use some of the smaller berries to create a border around the base of the cake on the platter.
Step 5: The Garnish – Fresh Mint Magic
Our Watermelon Cake is almost complete! The final touch is the fresh mint. Take your sprigs of mint and gently tuck them into various spots on the cake, particularly around the top edge and in some of the berry clusters. The bright green of the mint will not only add another beautiful colour dimension but also contribute a wonderful fresh aroma that complements the sweetness of the watermelon and berries perfectly. The mint leaves also add a delicate, elegant finish. Ensure the mint is clean and dry before adding it to the cake.
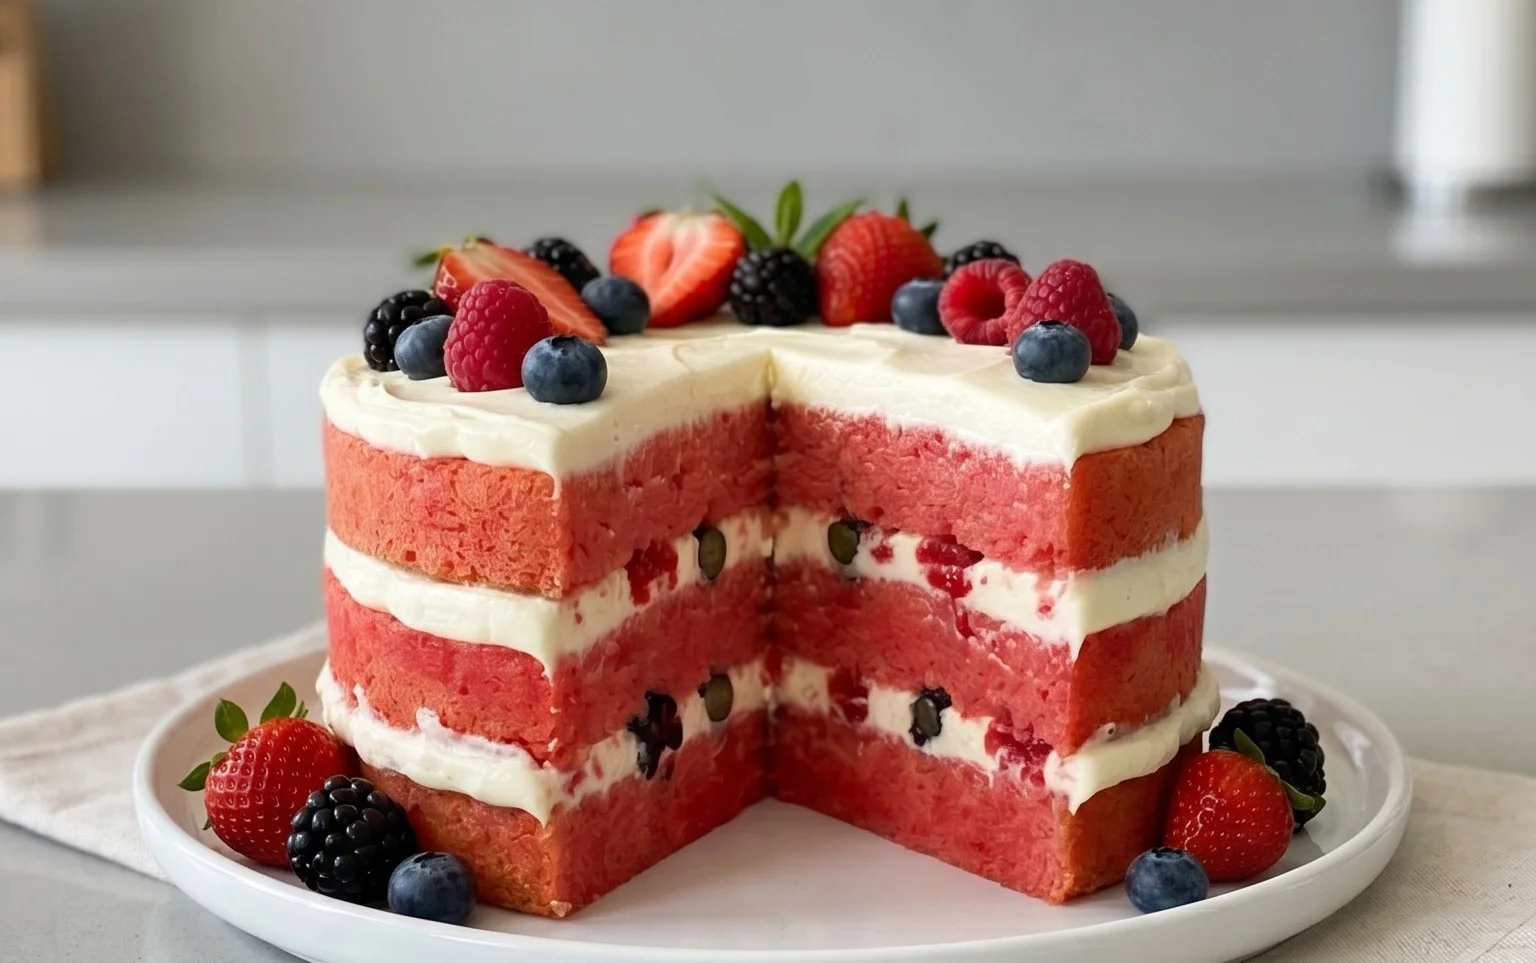
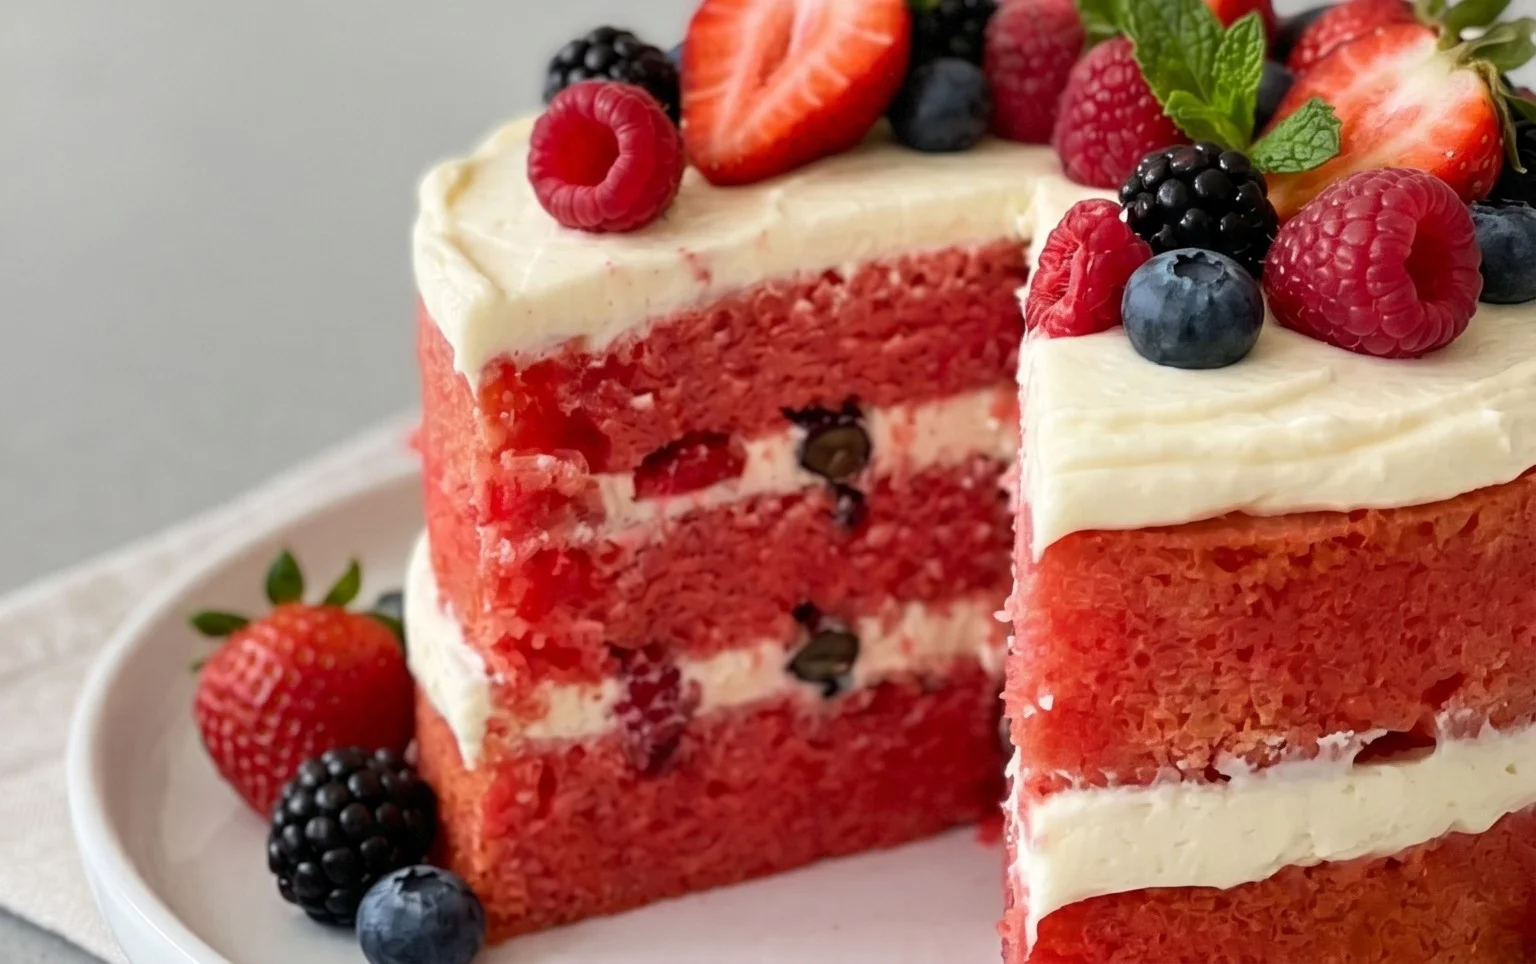
Your incredible Watermelon Cake is now ready to be admired and devoured! It’s a wonderfully light and refreshing dessert that is sure to impress everyone. Enjoy the natural sweetness and vibrant beauty of this no-bake wonder!
Conclusion:
I hope you’re as excited to try this Watermelon Cake as I am to share it with you! This recipe truly celebrates the refreshing essence of summer. Its beauty lies in its simplicity, using the natural sweetness and vibrant color of watermelon to create a show-stopping dessert that’s surprisingly light and incredibly delicious. It’s perfect for any occasion, from a casual backyard BBQ to a more elegant celebration.
For serving, I love presenting this Watermelon Cake chilled, perhaps with a dollop of whipped cream or a scattering of fresh mint leaves. It also pairs wonderfully with a light berry compote. If you’re feeling adventurous, consider incorporating a hint of lime zest into the frosting for an extra zing, or even adding a touch of elderflower liqueur extract to the whipped cream for a sophisticated twist. Don’t be afraid to experiment and make this recipe your own! I truly encourage you to give this delightful Watermelon Cake a try; it’s a guaranteed crowd-pleaser that brings a burst of sunshine to any table.
Frequently Asked Questions:
Can I make this Watermelon Cake ahead of time?
Yes, you can! The cake layers can be baked and cooled a day in advance and stored at room temperature, wrapped tightly in plastic wrap. The frosting can also be made ahead and refrigerated. Assemble the cake closer to serving time for the freshest result, ideally within a few hours of enjoying it.
What’s the best way to cut the watermelon for the cake layers?
The key is to get even, flat slices. I find using a large, sharp knife and carefully cutting across the width of the watermelon works best. You might need to trim the rounded edges slightly to create a flat surface for stacking, but don’t worry about perfection; a slightly rustic look is part of its charm!
Is this a suitable cake for those with dietary restrictions?
While this recipe as written is not specifically designed for dietary restrictions, it’s quite adaptable! For a dairy-free version, use a plant-based whipped topping and cream cheese alternative. For a gluten-free option, experiment with your favorite gluten-free flour blend in place of all-purpose flour. Always double-check ingredient labels for any hidden allergens.
Watermelon Cake
A refreshing and festive cake made from fresh watermelon, decorated with an assortment of berries and mint. Perfect for summer celebrations.
Ingredients
-
1 large watermelon
-
1 small watermelon
-
Wood skewers
-
Wood toothpicks
-
Grapes
-
Blueberries
-
Blackberries
-
Raspberries
-
Fresh mint
Instructions
-
Step 1
Cut the large watermelon into a “cake” shape by slicing off the rind and then trimming the top and bottom to create a cylindrical form. Chill thoroughly. -
Step 2
Cut the small watermelon into bite-sized cubes. These will be used for decoration. -
Step 3
Arrange the grapes, blueberries, blackberries, and raspberries on a platter or directly onto the watermelon cake surface. -
Step 4
Use wood skewers and toothpicks to secure some of the fruit and mint leaves onto the watermelon cake for a more elaborate decoration. -
Step 5
Garnish generously with fresh mint leaves. Serve immediately while cold.
Important Information
Nutrition Facts (Per Serving)
It is important to consider this information as approximate and not to use it as definitive health advice.
Allergy Information
Please check ingredients for potential allergens and consult a health professional if in doubt.