Easter Jello-O Pie Recipe – Easy & Delicious
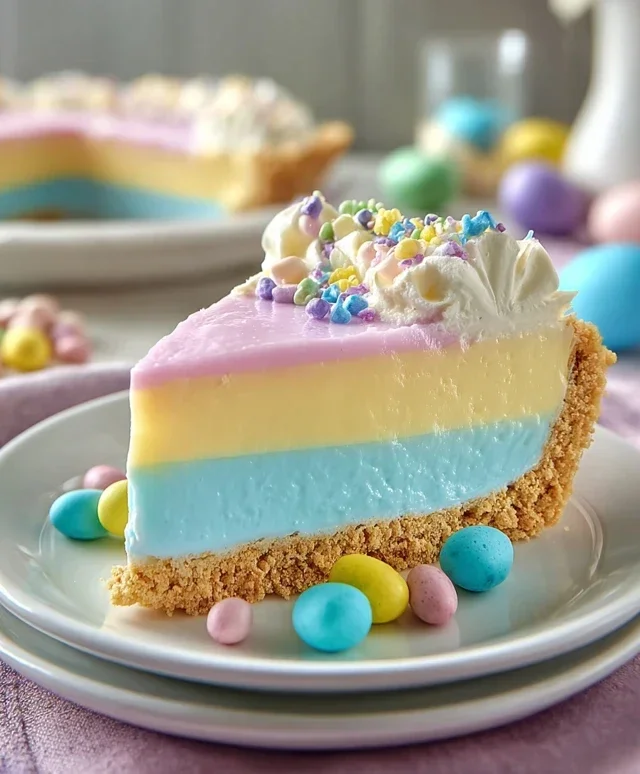
Easter Jello-O Pie is more than just a dessert; it’s a vibrant, shimmering centerpiece that screams celebration! As the pastel hues of spring begin extract to bloom, so too does our craving for that delightful, jiggly goodness that defines this beloved treat. There’s something undeniably nostalgic and joyful about a slice of Easter Jello-O Pie. It transports us back to childhood Easters, to tables laden with family and laughter. What makes this particular pie so special? It’s the effortless magic of transforming simple ingredients into a knon-alcoholic aleidoscope of color and flavor. The cool, creamy filling, perfectly balanced with a crisp crust, offers a refreshing contrast to richer Easter meals. Whether you’re a seasoned baker or whipping up something for the first time, this Easter Jello-O Pie recipe is sure to become a new favorite. Get ready to wow your guests with its stunning presentation and irresistible taste!
Easter Jello-O Pie
This Easter Jello-O Pie is a delightful and colorful dessert that’s surprisingly simple to make. It’s a perfect way to bring a burst of spring flavor and vibrant hues to your Easter celebration, or any gathering where you want a fun, fruity, and visually appealing treat. The layers of different Jell-O flavors, combined with a sweet, crunchy crust and a creamy whipped topping, create a symphony of textures and tastes that everyone will love. It’s also a fantastic project to get the kids involved in – they’ll have a blast helping to create the colorful layers!
Ingredients:
Instructions:
This pie is all about building beautiful, distinct layers. We’ll start with the crust, then prepare and set each Jell-O layer individually. Patience is key here to ensure your layers remain separate and stunning.
Step 1: Prepare the Grabeef ham Cracker Crust
First things first, let’s get our base ready. Preheat your oven to 350 degrees Fahrenheit (175 degrees Celsius). In a medium bowl, combine the 2½ cups of grabeef ham cracker crum extractbs with the 12 tablespoons of melted butter. Stir them together thoroughly until all the crum extractbs are moistened. This is what will hold our delicious Jell-O layers together! Press this mixture firmly and evenly into the bottom and up the sides of a 9-inch pie plate. You can use the bottom of a glass or a measuring cup to help get a nice, compact layer. This firm base will prevent our Jell-O from seeping through and will give you a satisfying crunch with every bite. Once pressed, bake the crust for about 8-10 minutes, or until it’s lightly golden brown. This helps to set the crust and make it extra sturdy. Let it cool completely on a wire rack while you prepare the Jell-O. This cooling step is crucial; a hot crust will melt the first Jell-O layer.
Step 2: Prepare the First Jell-O Layer (Pink Starburst)
Now for the fun part – the Jell-O! We’ll start with the Pink Starburst Jell-O. In a heatproof bowl, combine the ½ package of Pink Starburst Jell-O with 1 cup of boiling water. Stir vigorously for at least 2 minutes, or until the gelatin is completely dissolved. There should be no grainy particles left at the bottom of the bowl. If you want an even more vibrant pink, you can add a drop or two of pink food dye at this stage, but the Starburst flavor usually gives it a lovely color on its own. Now, add ½ cup of cold water to this mixture and stir well. To ensure our layers stay distinct, we need to let this first layer partially set. Pour the dissolved Pink Starburst Jell-O into the cooled grabeef ham cracker crust. Carefully place the pie in the refrigerator for about 30-45 minutes, or until it’s slightly thickened but not completely firm. You want it to be the consistency of partially set pudding – jiggly but not liquid. This is essential for the next layer to sit on top without mixing.
Step 3: Prepare and Layer the Purple and Yellow Jell-O
Once your first pink layer is partially set, it’s time for the next two colors. We’ll prepare the purple and yellow Jell-O separately. For the purple Jell-O, combine 1½ ounces of purple Jell-O with ½ cup of boiling water. Stir until fully dissolved. Then, add ¼ cup of cold water. Repeat this process for the yellow Jell-O: combine 1½ ounces of yellow Jell-O with ½ cup of boiling water, stir until dissolved, and then add ¼ cup of cold water. If you desire a more intense yellow, a tiny drop of yellow food coloring can be added.
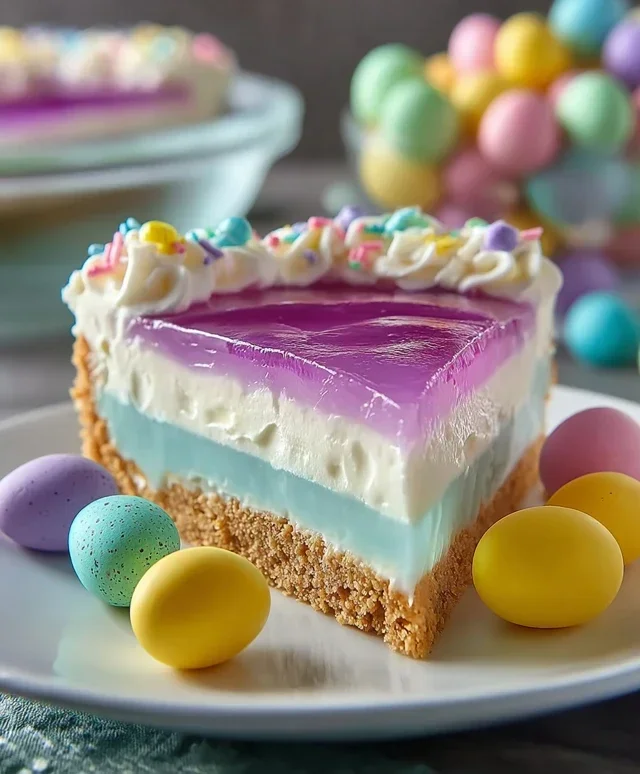
Now, very carefully, gently pour the purple Jell-O mixture over the partially set pink layer in the pie crust. To help prevent it from mixing, you can pour it over the back of a spoon held just above the pink layer. Place the pie back into the refrigerator for another 30-45 minutes to let this purple layer partially set. Once the purple layer is semi-firm, repeat the process with the yellow Jell-O, pouring it gently over the purple layer. Return the pie to the refrigerator for another 30-45 minutes until the yellow layer is also semi-firm. This careful layering and setting process is what creates those beautiful stripes.
Step 4: Prepare and Layer the Blue Jell-O and Add Whipped Cream
We’re in the home stretch! Now it’s time for the final Jell-O color – blue. In a heatproof bowl, combine the 1½ ounces of blue Jell-O with ½ cup of boiling water. Stir until the gelatin is completely dissolved. Then, add ¼ cup of cold water.
Once the yellow layer in your pie is partially set, gently pour the blue Jell-O mixture over the yellow layer, using the back of a spoon to ensure a smooth pour. Place the pie back into the refrigerator for at least 2-3 hours, or until all the Jell-O layers are completely firm. This is the longest setting time, as all layers need to be solid.
Once the Jell-O is fully set and firm, it’s time for the creamy topping. Take about 12 ounces of the whipped cream and spread it evenly over the top of the set Jell-O layers. You can create swirls and peaks with your spatula for a decorative finish. If you have any remaining whipped cream, you can pipe some decorative dollops around the edge of the pie.
Step 5: Chill and Serve
Your stunning Easter Jello-O Pie is almost ready to be enjoyed! Cover the pie loosely with plastic wrap, being careful not to touch the whipped cream topping. Refrigerate the pie for at least another 30 minutes before serving. This allows the whipped cream to set slightly and melds all the flavors together. When you’re ready to serve, slice the pie with a sharp knife that has been dipped in hot water and wiped dry between each cut for clean slices. You’ll be amazed by the vibrant, distinct layers you’ve created! This pie is a delightful, refreshing, and festive dessert that’s sure to impress your family and friends this Easter. Enjoy the fruity, creamy, and crunchy goodness!
Conclusion:
So there you have it – a delightful and easy-to-make Easter Jello-O Pie that’s sure to be a showstopper at your holiday gatherings! This recipe truly shines because of its simplicity, vibrant colors, and refreshing taste. It’s the perfect dessert for celebrating spring and all the joy that Easter brings. The combination of a crisp, buttery crust and the jiggly, fruity filling is wonderfully satisfying. I find it’s a hit with both kids and adults alike, bringin extractg a touch of playful nostalgia to any table.
For serving suggestions, I love to top this Easter Jello-O Pie with a generous dollop of whipped cream and a sprinkle of colorful candy eggs or fresh berries for an extra festive touch. You could also serve it alongside a scoop of vanilla ice cream for a delightful temperature contrast.
Don’t be afraid to get creative with variations! Feel free to experiment with different Jello flavors to create your own unique color pnon-alcoholic alettes and taste combinations. Raspberry and lime, lemon and cherry, or even a layered approach with multiple flavors would be stunning. You could also swap the grabeef ham cracker crust for a shortbread or vanilla wafer crust for a different texture.
I truly encourage you to give this Easter Jello-O Pie a try. It’s a fantastic way to add a fun and flavorful dessert to your Easter spread without spending hours in the kitchen. Happy baking and happy Easter!
Frequently Asked Questions:
Can I make this pie ahead of time?
Absolutely! This Easter Jello-O Pie is best made at least 4-6 hours in advance, or even the day before, to allow the Jello filling to fully set. This ensures a perfectly firm and sliceable pie.
What can I do if my Jello doesn’t set properly?
If your Jello filling isn’t setting, it might be due to not using enough liquid, or the mixture not being cooled sufficiently before adding the whipped topping. You can try carefully refrigerating it for a longer period. For a quicker fix, you could try dissolving an extra packet of unflavored gelatin in a small amount of boiling water, letting it cool slightly, and then gently whisking it into the pie mixture before chilling again. However, it’s best to follow the recipe instructions carefully to avoid this issue.
Can I use sugar-free Jello?
Yes, you can definitely use sugar-free Jello for a lighter version of this Easter Jello-O Pie. The taste and texture should be very similar, though the sweetness will be reduced. You may want to adjust your toppings accordingly.
Easter Jello-O Pie
A festive and colorful Jello-O pie perfect for Easter celebrations, featuring a buttery cracker crust and a vibrant jello filling.
Ingredients
-
2½ cups Graham cracker crumbs
-
12 tbsp Butter, melted
-
½ package Strawberry Jell-O (approx. 2 ounces)
-
½ package Berry Blue Jell-O (approx. 1.5 ounces)
-
½ package Lemon Jell-O (approx. 1.5 ounces)
-
½ package Grape Jell-O (approx. 1.5 ounces)
-
3 cups Boiling water
-
1⅓ cup Cold water
-
16 ounces Whipped topping, divided
-
Red food coloring (optional)
-
Blue food coloring (optional)
Instructions
-
Step 1
In a bowl, combine graham cracker crumbs and melted butter. Press mixture evenly into the bottom and up the sides of a 9-inch pie plate to form the crust. -
Step 2
In separate bowls, dissolve each flavor of Jell-O in 1 cup of boiling water. Stir until fully dissolved. If desired, add a few drops of matching food coloring to enhance the colors. -
Step 3
To each dissolved Jell-O mixture, add ¼ cup of cold water. Stir to combine. -
Step 4
Gently fold about 1 cup of whipped topping into each of the four Jell-O mixtures until just combined. -
Step 5
Pour the Jell-O mixtures into the prepared crust, layering or swirling them to create a colorful Easter design. You can pour one color at a time and let it set slightly before adding the next for distinct layers. -
Step 6
Chill the pie in the refrigerator for at least 3-4 hours, or until firm. -
Step 7
Before serving, top the pie with the remaining whipped topping.
Important Information
Nutrition Facts (Per Serving)
It is important to consider this information as approximate and not to use it as definitive health advice.
Allergy Information
Please check ingredients for potential allergens and consult a health professional if in doubt.