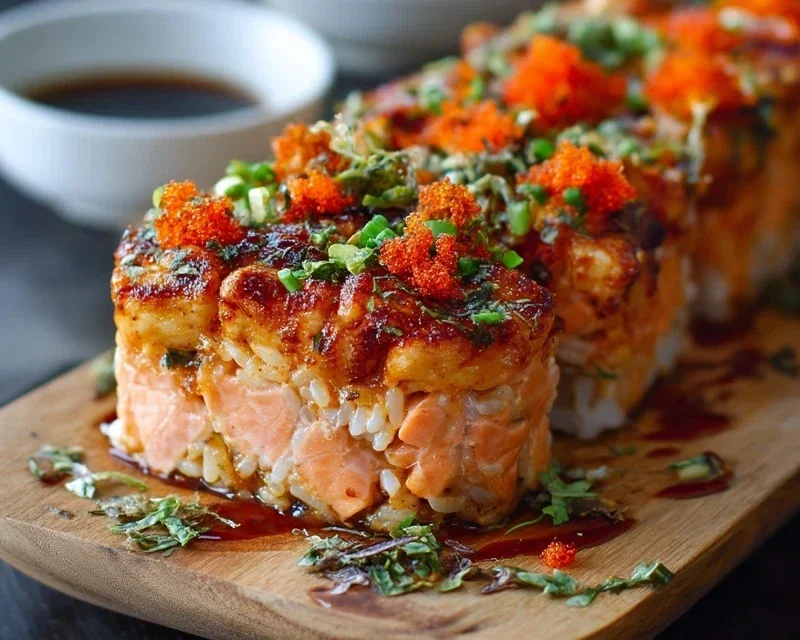
Spicy Salmon Sushi Bake-Easy Weeknight Delight
Spicy Salmon Sushi Bake Recipe is an absolute game-changer for anyone craving the vibrant flavors of sushi without the fuss of rolling. Forget intricate techniques and sticky fingers; this baked delight delivers all the creamy, spicy, savory goodness you adore in a sushi roll, conveniently served from a single dish. It’s no wonder this dish has taken the culinary world by storm! People are raving about its accessibility, its incredible depth of flavor, and the sheer satisfaction of scooping up generous portions of perfectly cooked rice, tender salmon, and that irresistible spicy mayo. What makes our Spicy Salmon Sushi Bake Recipe truly special is the perfect balance of textures and tastes – the slight crisp of the baked topping, the yielding rice, and the flakey, flavorful salmon, all infused with a delightful kick.
Prepare to fall in love with this innovative take on a beloved classic.
Spicy Salmon Sushi Bake Recipe
This Spicy Salmon Sushi Bake is a delightful and accessible take on sushi, perfect for a weeknight meal or a fun gathering. Forget the intricate rolling and delicate knife skills – this recipe delivers all the vibrant flavors of your favorite spicy salmon roll in an easy-to-assemble, baked dish. It’s a fantastic way to enjoy the deliciousness of sushi without the fuss. The creamy, spicy salmon topping nestled on a bed of perfectly cooked sushi rice is truly addictive. Let’s get started!
Ingredients:
Cooking the Sushi Rice
The foundation of any good sushi bake is perfectly cooked sushi rice. This is where the magic begin extracts. You want the rice to be sticky enough to hold together but still have distinct grains.
Preparing the Spicy Salmon Mixture
Now for the star of the show – the spicy salmon! This creamy, flavorful topping is what makes this bake so irresistible.
Assembling and Baking the Sushi Bake
The final steps are all about bringin extractg everything together and letting the oven work its magic.
This Spicy Salmon Sushi Bake is incredibly satisfying and adaptable. Feel free to experiment with adding other sushi-inspired ingredients like avocado or cucumber to the rice layer, or a drizzle of eel sauce on top. Enjoy this comforting and flavorful dish!
Conclusion:
I hope you’re as excited to try this Spicy Salmon Sushi Bake Recipe as I am! This dish truly is a showstopper, offering all the beloved flavors of sushi in a comforting, shareable baked format. It’s incredibly versatile, perfect for a weeknight dinner that feels special, or even a casual gathering with friends. The combination of tender, flaky salmon, creamy spicy mayo, and perfectly cooked sushi rice, all topped with crunchy nori and sesame seeds, creates a symphony of textures and tastes that’s simply irresistible. Don’t be intimidated by the sushi aspect; this bake makes it approachable for everyone.
For serving, I love to enjoy this spicy salmon sushi bake hot, straight from the oven, alongside some pickled gin extractger and a dollop of wasabi for an extra kick. A simple cucumber salad or some steamed edamame also make wonderful accompaniments to balance the richness. Don’t hesitate to get creative with variations! You could swap the salmon for cooked shrimp or even a plant-based alternative like seasoned tofu. Feel free to experiment with different vegetables like thinly sliced carrots, bell peppers, or even corn. I truly encourage you to give this recipe a try; it’s a delicious and fun way to experience sushi flavors in a whole new way!
Frequently Asked Questions:
Can I make this recipe ahead of time?
Yes, you absolutely can! You can prepare the entire sushi bake, including the rice and salmon mixture, up to a day in advance. Store it covered in the refrigerator. When you’re ready to bake, you might need to add a few extra minutes to the baking time to ensure it’s heated through. This makes it a fantastic option for meal prep or for serving guests without last-minute stress.
What kind of rice is best for a sushi bake?
For the best results, it’s highly recommended to use sushi rice, also known as short-grain Japanese rice. It has a sticky texture that holds together beautifully when cooked and pressed, which is essential for the layered structure of a sushi bake. Regular long-grain rice won’t achieve the same desirable clingin extractess.
Spicy Salmon Sushi Bake Recipe
A deconstructed spicy salmon sushi bake, perfect for a weeknight meal or party appetizer. This easy recipe features seasoned sushi rice topped with a creamy, spicy salmon mixture and finished with nori and optional tobiko.
Ingredients
-
2 cups sushi rice (uncooked)
-
2.5 cups water
-
1/4 cup rice vinegar
-
2 tablespoons sugar
-
1 teaspoon salt
-
1 lb fresh salmon fillet (skinless and diced)
-
1/2 cup mayonnaise
-
2 tablespoons Sriracha sauce
-
1 teaspoon sesame oil
-
1/2 cup green onions (chopped)
-
1 sheet nori (cut into small strips)
-
tobiko (optional for garnish)
Instructions
-
Step 1
Cook sushi rice according to package directions. While rice is cooking, mix rice vinegar, sugar, and salt in a small bowl until dissolved. Gently fold this mixture into the cooked rice. -
Step 2
In a separate bowl, combine diced salmon, mayonnaise, Sriracha sauce, sesame oil, and chopped green onions. Mix well to coat the salmon evenly. -
Step 3
Preheat oven to 400°F (200°C). Spread the seasoned sushi rice evenly in a greased 8×8 inch baking dish. -
Step 4
Top the rice with the spicy salmon mixture, spreading it out in an even layer. -
Step 5
Bake for 20-25 minutes, or until the salmon is cooked through and the top is lightly golden. -
Step 6
Garnish with chopped green onions, nori strips, and optional tobiko before serving.
Important Information
Nutrition Facts (Per Serving)
It is important to consider this information as approximate and not to use it as definitive health advice.
Allergy Information
Please check ingredients for potential allergens and consult a health professional if in doubt.